
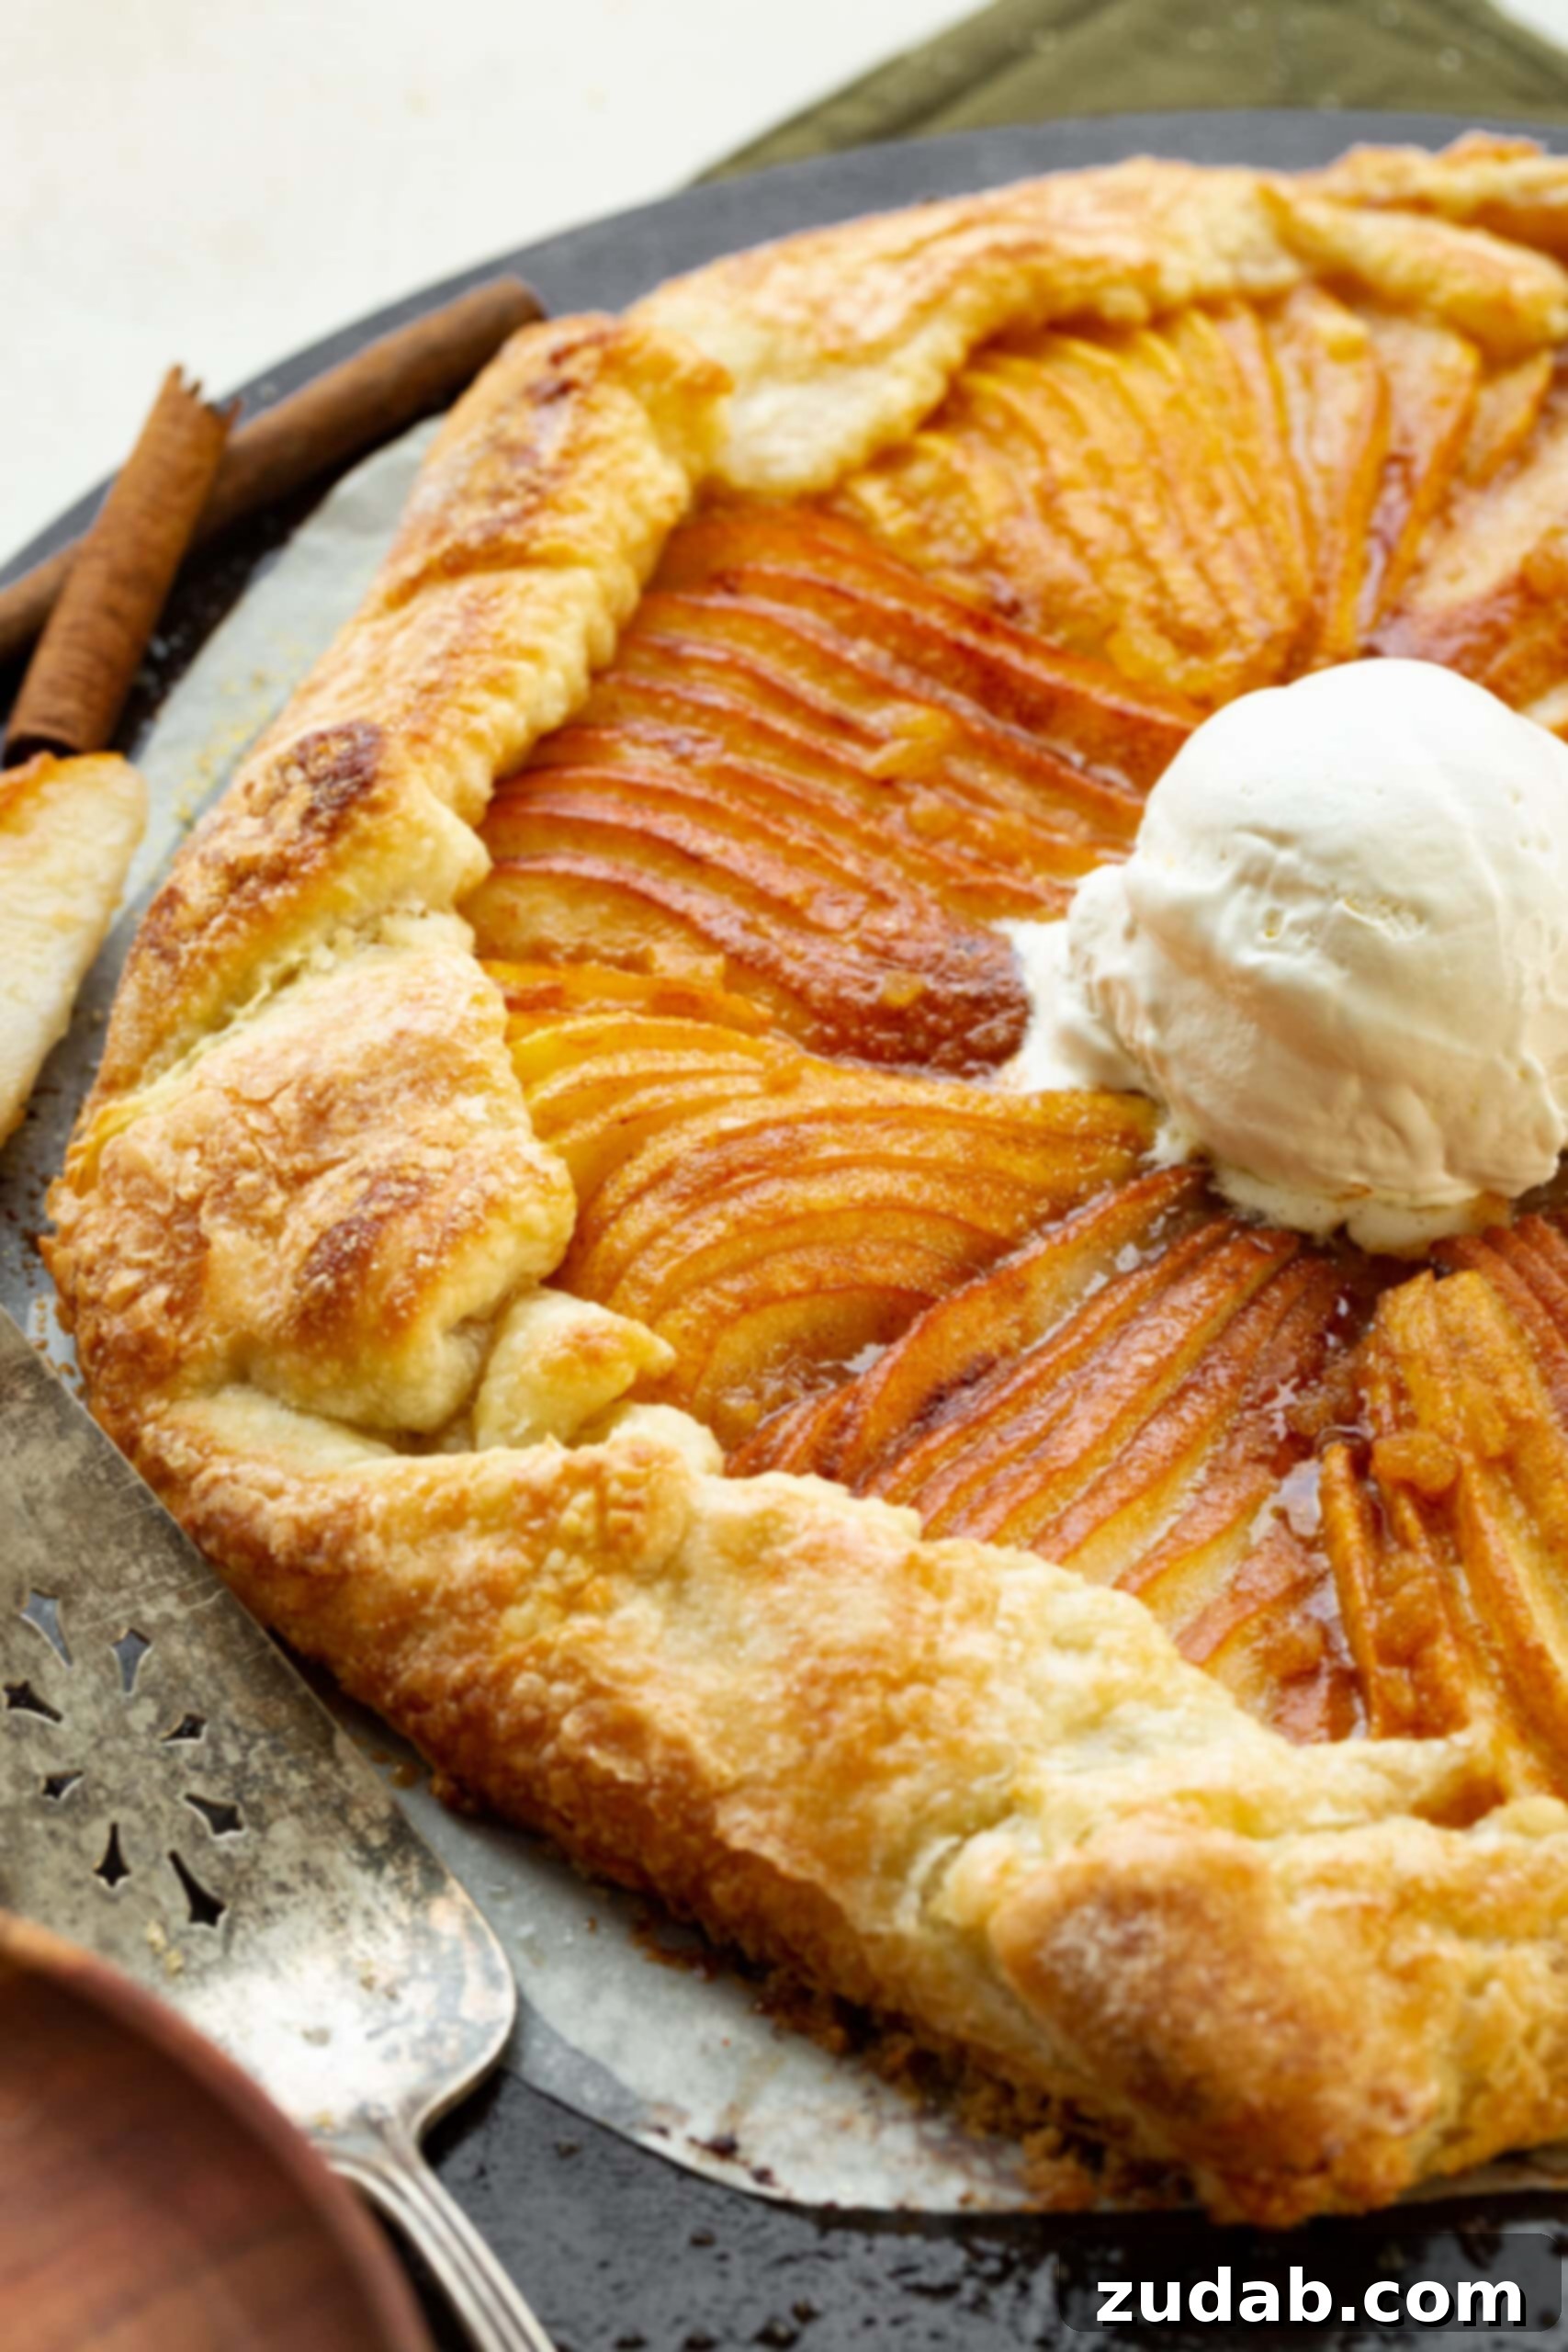
The Perfect Sugared Pear Galette: An Irresistible Rustic Fall Dessert
Imagine succulent, thinly sliced pears, delicately sweetened and nestled within a golden, buttery, and impossibly flaky crust. This isn’t just any dessert; it’s a rustic-style pie known as a galette, and this Perfect Sugared Pear Galette Pie is, without a doubt, one of the most sublime treats you’ll ever bake and taste. It offers all the comforting flavors of a traditional pie with a delightfully unfussy presentation that makes it approachable for any home baker.
Thanksgiving is often synonymous with apple and pumpkin pies, but this past holiday season, a void was felt at our table. My family, while appreciating a good meal, isn’t always keen on pie. I, however, had a persistent craving for a warm, comforting fruit dessert. My friend Kerri and I initially planned a post-holiday get-together to satisfy this desire, but fate intervened with an unexpected sick child, forcing us to reschedule.
Despite the change of plans, the idea of a delightful pear dessert wouldn’t leave my mind. So, the very next Saturday, I embarked on a culinary experiment, testing various recipes. What emerged from my kitchen was truly inspired! Every single member of my family devoured it with enthusiasm. My husband, Cade, usually a staunch advocate for apple pie, declared this pear galette his new absolute favorite. This isn’t just a recipe; it’s a revelation, guaranteed to bring pears into the spotlight where they truly belong.
Essential Ingredients for Your Delicious Pear Galette
Creating this exceptional pear galette requires surprisingly few ingredients – just eight core components, in fact, plus a simple egg wash. You might be amazed, as I was when I first counted them! Most of these items are likely already in your pantry. The only things you might need to pick up from the store are the fresh pears and a touch of candied ginger, unless you’re short on common baking staples. Here’s a detailed look at what you’ll need to assemble this magnificent dessert:
For the Flaky Galette Crust
- All-Purpose Flour: The foundation of our tender, flaky crust. Regular unbleached all-purpose flour works perfectly.
- Granulated Sugar: A small amount adds a subtle sweetness to the crust, complementing the pear filling.
- Salt: A crucial flavor enhancer that balances the sweetness and deepens the overall taste of the crust.
- Unsalted Butter (Chilled): The star ingredient for flakiness. Keeping it very cold ensures those distinct, delicate layers. If only salted butter is available, simply omit the extra salt from the recipe.
- Ice Water: Absolutely essential. The colder the water, the better it helps the butter remain solid, creating a truly spectacular flaky texture in your crust.
For the Irresistible Pear Filling
- Butter: Adds a rich, luxurious flavor and smooth consistency to the pear filling. We’ll be browning it for an extra depth of flavor.
- Pears: The heart of the galette. I recommend a delightful combination of Bartlett and Bosc pears for their distinct flavors and textures. Anjou pears are also an excellent choice. Look for firm-ripe pears that will hold their shape beautifully during baking.
- Granulated Sugar: Sweetens the pears, allowing their natural flavors to shine and creating a beautiful, syrupy glaze.
- Flour: A small amount helps to thicken the pear juices, preventing a soggy crust and ensuring a perfectly set filling.
- Ground Cinnamon: Infuses the filling with that quintessential warm, aromatic fall and holiday spice, pairing beautifully with pears.
- Candied Ginger: This is the secret weapon that elevates this galette! Minced candied ginger adds a surprising, bright, and slightly spicy pop of flavor that is truly amazing and evokes a wonderful holiday spirit.
For the Golden Egg Wash
- Large Egg: Whisked well, it gives the crust a gorgeous golden-brown hue and a slight sheen when baked.
- Water: Thins out the egg wash slightly, making it easier to brush evenly and contribute to a more sugary, glistening crust.
- Granulated Sugar: Sprinkled over the egg-washed crust, it creates a delightful sparkle and a pleasant, slightly crisp caramelized sugar topping.
The precise measurements for each of these ingredients can be found in the comprehensive recipe card at the end of this post. You can easily save, print, or bookmark the recipe from there for future baking adventures.
Mastering the Art of the Pear Galette: Four Top Tips for Success
While this pear galette is surprisingly simple to make, a few crucial techniques transform it from a good dessert into an extraordinary one. Pay close attention to these four important tips to ensure your galette is the absolute best it can be:
- The Revolutionary Layered Crust: Forget about traditional pie crusts that can be notoriously tricky. For this galette, we employ a unique method that yields an unbelievably flaky, almost puff-pastry-like dough. The secret lies in rolling out chilled butter into thin sheets within the flour mixture, a technique I discovered in an old cookbook. While the original version was overly complex and time-consuming, I’ve simplified it significantly, making it incredibly easy and foolproof. If you’ve ever struggled with pie crusts, this method will become your new best friend, delivering layers of buttery perfection without the stress.
- The Magic of Brown Butter: Need I say more? Brown butter (beurre noisette) is a game-changer. By gently cooking butter until the milk solids toast and turn golden brown, you unlock a deep, nutty, and incredibly aromatic flavor that elevates anything it touches. Incorporating brown butter into our pear filling adds an unparalleled richness and complexity, making the fruit flavor even more profound. If you’re new to browning butter, you can find detailed instructions in our chewy pumpkin cookies post. It’s a simple step that makes a huge difference.
- Choosing the Right Pears: Slightly Firm is Key: The type and ripeness of your pears significantly impact the final texture of your galette. I personally favor Bosc pears for their elegant flavor and firm texture, but Bartlett and Anjou varieties are also excellent choices. In fact, I love to layer both Bartlett and Bosc pears into the crust for a beautiful variety in taste, texture, and color. The most important thing is to select pears that are *slightly firm* to the touch, rather than overly soft or mushy. This ensures they hold their shape during the baking process and don’t turn into an unappealing pulp. They should be ripe enough for flavor, but firm enough to maintain integrity.
- The Secret Sparkle: Candied Ginger! I know, candied ginger might not be the first ingredient that comes to mind for a pear dessert, but trust me, it’s the ultimate secret weapon. Initially, I considered sprinkling some at the end for a decorative sparkle. However, by mincing it finely and tossing it directly with the pear filling, it imparts a tiny, yet powerful, burst of warm, zesty flavor. This unexpected addition creates a total holiday vibe that is wonderfully aromatic and absolutely addictive. It’s a subtle touch that transforms the entire galette experience.
Crafting Your Layered Pastry Crust: A Step-by-Step Guide
Making this galette crust might differ slightly from traditional pie crusts you’re accustomed to, but I promise, it will quickly become your new favorite pastry dough! If the thought of a perfect, crimped traditional pie crust intimidates you, then this simple, rustic style is an ideal alternative. Many find it significantly easier to work with, yet it delivers superior flakiness. Let’s walk through each step to create this incredible foundation for your pear galette.
- Prepare Dry Ingredients and Butter: In a medium-sized mixing bowl, thoroughly whisk together your all-purpose flour, granulated sugar, and salt. Take your cold unsalted butter (one and a half sticks) and cut each stick in half lengthwise, then again crosswise, creating four long, rectangular pieces. Toss these butter sticks generously in the prepared flour mixture until each piece is well coated. Now, carefully dump this butter-and-flour mixture directly onto a clean, dry countertop.
- Begin Rolling the Butter into Sheets: Using a sturdy rolling pin, begin rolling the butter pieces into long, thin strips. As you roll, some butter may stick to your rolling pin or the countertop; don’t worry, this is normal. Use a bench scraper to carefully scrape up any stuck butter and reincorporate it into the mixture. Continuously sprinkle flour from the counter over your rolling pin and butter to prevent sticking, ensuring the butter remains cold and distinct. The goal is to flatten the butter into elongated, thin sheets rather than fully blending it into the flour.
- Add Ice Water and Moisten: Once all the butter has been rolled into long, flat sheets within the flour, use your bench scraper to gently gather everything into a loose pile. Sprinkle precisely four tablespoons of ice-cold water evenly over the mixture. Now, use your hands to gently toss and combine the mixture until all the dry bits of flour are moistened. Be careful not to overwork the dough; you want it just moist enough to hold together.
Folding for Flaky Perfection
This “folding” technique is what creates those coveted layers of buttery, flaky crust. It’s simpler than it sounds and incredibly effective.
- First Fold: Gather the moistened dough into a rough rectangular shape. At this stage, it will look quite shaggy and uneven, but don’t fret – this is part of the process. Roll the dough out into a long rectangle, positioning the short end closest to you. Using your bench scraper, fold the top third of the dough down over the middle section. Then, fold the bottom third of the dough up and over the newly folded top section, creating a neat rectangle folded into thirds, much like a letter. It will still feel somewhat crumbly, but you’re building layers!
- Second and Third Folds: Turn the dough 90 degrees (a quarter turn). Roll the dough out again into a long rectangle. Repeat the folding process, bringing the top third down and the bottom third up. Turn the dough 90 degrees once more, roll it out, and perform the final third fold. By this point, your dough should be much more cohesive and less crumbly. While you *could* do one more fold if needed, I find that three folds typically yield the best results for a perfectly flaky texture.
- Chill the Dough: After the final fold, wrap the dough tightly in plastic wrap. Place it in the refrigerator to chill for 30 to 45 minutes. This chilling period is crucial as it allows the gluten to relax and the butter to firm up, making the dough easier to handle and ensuring maximum flakiness when baked.
- Roll and Prepare for Filling: On a lightly floured surface, roll the chilled dough out into a rough circular shape, approximately 12-14 inches in diameter. Carefully transfer this dough circle onto a piece of parchment paper, which should then be placed on a baking sheet or a baking stone. Cover the dough loosely with plastic wrap and refrigerate it again while you prepare your delicious pear filling.
At this point, your exquisite crust is ready to be filled. The repeated rolling and folding process, known as laminating, creates countless layers of butter and dough that expand and separate in the oven, resulting in a wonderfully flaky and utterly delicious base for your galette.
What Exactly is a Galette?
A galette is the epitome of rustic charm in the world of pastries. It is a free-form pie, meaning it doesn’t require a pie plate or any intricate crimping, lattice work, or fancy top crusts. Traditionally, it’s made with a single crust of pastry or bread dough that is simply folded over a fruit or savory filling. While it *can* be baked in a pie tin, its beauty lies in its simplicity, often baked directly on a cookie sheet or baking stone. You get all the incredible flavors and satisfying textures of a homemade pie, but without the stress and precision often associated with traditional pie baking. It’s approachable, elegant in its simplicity, and always a crowd-pleaser.
Irresistible Toppings for Your Pear Galette
While a warm slice of this sugared pear galette is undeniably delicious on its own, it transforms into an extra divine experience with the right topping. The classic choice is a generous scoop of creamy vanilla ice cream, melting slightly over the warm, sweet pears and flaky crust. The contrast of cold and warm, and the creamy richness against the fruit and pastry, is simply heavenly. If ice cream isn’t available, a dollop of freshly whipped cream also makes an extraordinary accompaniment, adding a light, airy sweetness that complements the galette beautifully. For an added touch, consider a sprinkle of toasted pecans or a light drizzle of caramel sauce.
Storing, Reheating, and Freezing Your Galette for Future Enjoyment
This pear galette is not only delicious but also remarkably convenient for make-ahead preparations, as it stores exceptionally well. Whether you’re planning a dinner party or simply want to savor leftovers, here’s how to properly handle your galette:
Storing: If you intend to serve the galette on the same day it’s baked, you can prepare and bake it in the morning and then store it at room temperature. Simply cover it loosely with foil or a clean kitchen towel to keep it fresh until you’re ready to serve. For any leftover galette, transfer it to an airtight container and refrigerate for up to 3-4 days. Be aware that the crust may begin to soften slightly after the first day, but the flavors will still be wonderful.
Reheating: To restore that warm, comforting quality, reheating is simple. For a whole galette or larger slices, place it on a baking sheet and warm it in a preheated oven at 375 degrees F (190 degrees C) for approximately 10-15 minutes, or until thoroughly heated through and the crust begins to crisp again. If you’re reheating just a single serving, a quick zap in the microwave for about 30-60 seconds will do the trick, though the crust might not regain its original crispness.
Freezing: Leftover galette also freezes exceptionally well, making it perfect for portioning and enjoying later. Once the galette has cooled completely, wrap individual slices or the entire cooled galette tightly in plastic wrap, then place it in a freezer-safe and airtight container or freezer bag. It will maintain its quality in the freezer for up to 3 months. When ready to enjoy, thaw it in the refrigerator overnight, then reheat as described above for a nearly fresh-baked taste.
Can I Substitute Apples for Pears in This Recipe?
I understand that some of you might be firmly in the apple camp and hesitant to try this recipe with pears. Fear not! While I passionately advocate for the unique flavor of pears in this galette, it can absolutely be made with apples instead. The process is very similar, with just a few minor adjustments. For best results with apples, I recommend using a combination of Granny Smith and Honeycrisp apples to achieve a balance of tartness and sweetness, along with good texture. Slice your apples thinly (you can peel them if you prefer, though leaving the skin on adds fiber and rustic charm). Layer them beautifully in the center of the crust, just as you would the pears.
Regarding baking, you’ll want to bake it at 400 degrees F (200 degrees C) for 30-40 minutes. For an even better texture, especially if you want to ensure the apples are tender without being mushy, I suggest sautéing your thinly sliced apples in a pan for about 5 minutes before assembling the galette. This pre-cooking step softens them slightly and helps to concentrate their flavors, which means your galette will only need about 30 minutes to bake in the oven.
Why You’ll Absolutely Adore This Sugared Pear Galette
Let me highlight just a few of the many compelling reasons why this sugared pear galette is destined to become a beloved staple in your dessert repertoire. It’s more than just a recipe; it’s an experience that combines ease, incredible flavor, and comforting warmth:
- Effortlessly Flaky Crust: The crust is a dream to work with. It’s wonderfully buttery, incredibly flaky, and deceptively easy to make. Best of all, there’s absolutely no need for complex shaping, intricate crimping, or any other fancy crust work. Its rustic charm means imperfect edges are not just acceptable but celebrated!
- A Symphony of Fall Flavors: The harmonious blend of juicy, sweet pears with warm cinnamon and that unexpected, bright zing of candied ginger is the very essence of autumn and the holiday season. It creates a comforting, aromatic profile that is both familiar and exciting.
- Minimal Ingredients, Maximum Impact: You only need eight simple ingredients to create this exquisite dessert from start to finish. This streamlined ingredient list means less grocery shopping and more time enjoying your creation.
- A Guaranteed Family Favorite: This galette has quickly become a new family favorite in our home, surpassing even traditional apple pies. Its delightful taste and inviting aroma are sure to win over everyone at your table, even the most discerning palates.
- Perfect for Make-Ahead: Its excellent storage properties make it an ideal dessert for preparing in advance. Bake it in the morning, store it on the counter, and serve it fresh later in the day, freeing up your time when you need it most.
- Versatile Serving Options: While phenomenal on its own, a scoop of vanilla ice cream or a dollop of whipped cream elevates it to divine status. Yet, even without any accompaniments, its rich flavor and perfect texture are outstanding.
- All the Comfort, None of the Fuss: You get all the heartwarming flavor and comforting satisfaction of a homemade pie, but without the extensive work, intricate steps, and significant time commitment often required for traditional pie making. It’s homemade goodness, simplified.
Pears… they are the often-forgotten, yet utterly delicious, flavor of fall. Too often, they get overshadowed by the endless parade of pumpkin and apple recipes that flood our social media feeds and holiday tables. But this recipe is here to change that narrative! Our Perfect Sugared Pear Galette Pie is a testament to the pear’s exquisite potential, and it’s guaranteed to bring this wonderful fruit back to the center of your dessert party!
More Delicious Pear and Galette Recipes You’ll Love
- Apple Pear Pie
- Italian Pear Cake
- Plum Galette
- Strawberry Rhubarb Galette
- Peach Blackberry Galette
Sugared Pear Galette Pie
By Sweet Basil
Servings: 8
Ingredients
For the Crust
- 1 Tablespoon Sugar
- 3/4 Teaspoon Salt
- 1 1/3 Cups All-Purpose Flour
- 3/4 Cup Unsalted Butter, chilled
- 4 Tablespoons Ice Water
For the Filling
- 3 Tablespoons Butter
- 1/2 teaspoon Ground Cinnamon
- 1/4 Cup Granulated Sugar
- 1 Tablespoon All-Purpose Flour
- 1 1/2 Tablespoons Candied Ginger, minced
- 4 Pears, firm but ripe (see note)
For the Egg Wash
- 1 Large Egg, whisked
- 2 Tablespoons Water
- 3 Tablespoons Granulated Sugar, for sprinkling
Change unit system: US Customary – Metric
Instructions
For the Crust
- Whisk the 1 Tablespoon sugar, 3/4 Teaspoon salt, and 1 1/3 Cups flour together in a medium bowl. Cut the 3/4 Cup unsalted butter in half lengthwise, then in half again crosswise, creating 4 long rectangular sticks. Toss the butter sticks in the flour mixture until well coated. Dump the butter and flour mixture onto a clean countertop.
- Using a rolling pin, begin rolling the butter into long, thin strips. Use a bench scraper to scrape up any butter sticking to the counter or rolling pin. Continuously use the flour on the counter to coat the rolling pin and butter as needed to prevent sticking.
- Once all the butter is in long sheets, use the scraper to pull everything into a loose pile. Sprinkle 4 Tablespoons of ice water on top and use your hands to gently toss the mixture together until everything is moistened.
- Gather the mixture into a rough rectangle. Do not worry about how shaggy it looks; we will refine that. Roll the dough into a long rectangle with the short end facing you. Use a bench scraper again to fold the top third of the dough over itself downward, and then fold the bottom third up over the top, creating a dough folded into thirds like a letter. It will still be crumbly at this stage.
- Turn the dough 90 degrees. Roll the dough out again into a long rectangle. Then, fold it into thirds again. Turn it 90 degrees once more and roll out one final time. At this point, it should be a more cohesive dough. You can repeat the rolling and folding one more time if necessary to fully bring it together, but three times is usually ideal.
- Fold the dough into thirds one last time and wrap it tightly in plastic wrap. Chill the dough in the refrigerator for 30-45 minutes.
- On a lightly floured surface, roll the chilled dough out into a rough circle, approximately 12-14 inches in diameter. Carefully transfer it to parchment paper placed on a cookie sheet or baking stone. Cover it loosely with plastic wrap and refrigerate while you prepare the filling.
For the Filling
- In a small skillet over medium heat, cook the 3 Tablespoons butter until it smells nutty and turns a foamy, golden-brown color. Immediately remove it from the heat and transfer it to a bowl, scraping any browned bits from the bottom to cool. This is your brown butter.
- In a small bowl, stir together the 1/2 teaspoon cinnamon, 1/4 Cup sugar, 1 Tablespoon flour, and 1 1/2 Tablespoons minced candied ginger. Prepare the 4 pears: slice off the stems and bottoms, then cut each pear in half. Using a melon baller or a small spoon, scoop out the seeds and core.
- Lay the pear halves cut-side down and slice them into thin, even pieces. You can leave the tops slightly attached so they fan out easily when arranged. Remove the chilled pastry crust from the fridge and brush the center of the dough, leaving a 3-inch border around the edges, with some of the cooled brown butter.
- Sprinkle about 1 tablespoon of the prepared sugar-cinnamon-ginger mixture over the buttered center of the crust. Then, fan the thinly sliced pears decoratively over the top of the sugar mixture. Brush the fanned pears with the remaining brown butter, gently lifting layers to brush in between if desired. Heavily sprinkle all the remaining sugar-cinnamon-ginger mixture over the pears.
- Begin folding up the 3-inch border of the crust over the bottoms of the pears, working your way around the circle. As you fold, wet your fingers with a little water and brush it onto the dough where it overlaps to help seal the folds together.
- Place the assembled galette back in the fridge to chill briefly while you preheat your oven to 400 degrees F (200 degrees C). For an extra crisp crust, you can preheat a baking stone in the oven and then carefully transfer the galette to the hot stone for baking.
- Whisk the 1 Large egg and 2 Tablespoons water together for the egg wash. Use a little more water than a standard egg wash; this will help create a more sugary topping. Brush the egg wash generously over the folded crust. Heavily sprinkle the crust with the remaining 3 Tablespoons sugar. You don’t have to use all of it, just as much as you’d like, but I recommend being liberal for that beautiful shimmer.
- Bake the galette in the preheated oven at 400 degrees F (200 degrees C) for 30-40 minutes, or until the crust is deeply golden brown and the pears are tender and caramelized. Set aside to cool for at least 20 minutes before slicing and serving. Enjoy!
Recipe Notes
I find a combination of 2 Bartlett and 2 Bosc pears yields the best flavor and texture for this galette.
Nutrition
Serving: 1 slice, Calories: 382kcal, Carbohydrates: 44g, Protein: 3g, Fat: 22g, Saturated Fat: 14g, Polyunsaturated Fat: 1g, Monounsaturated Fat: 6g, Trans Fat: 1g, Cholesterol: 78mg, Sodium: 264mg, Potassium: 141mg, Fiber: 3g, Sugar: 22g, Vitamin A: 715IU, Vitamin C: 4mg, Calcium: 23mg, Iron: 1mg
Nutrition information is automatically calculated, so should only be used as an approximation.
Like this? Leave a comment below!
REMEMBER TO SUBSCRIBE TO our FREE Oh Sweet Basil NEWSLETTER AND RECEIVE EASY RECIPES DELIVERED INTO YOUR INBOX EVERY DAY!
When you try a recipe, please use the hashtag #ohsweetbasil on INSTAGRAM for a chance to be featured in our stories! FOLLOW OH, SWEET BASIL ON FACEBOOK | INSTAGRAM | PINTEREST | TWITTER FOR ALL OF OUR LATEST CONTENT, RECIPES AND STORIES.