
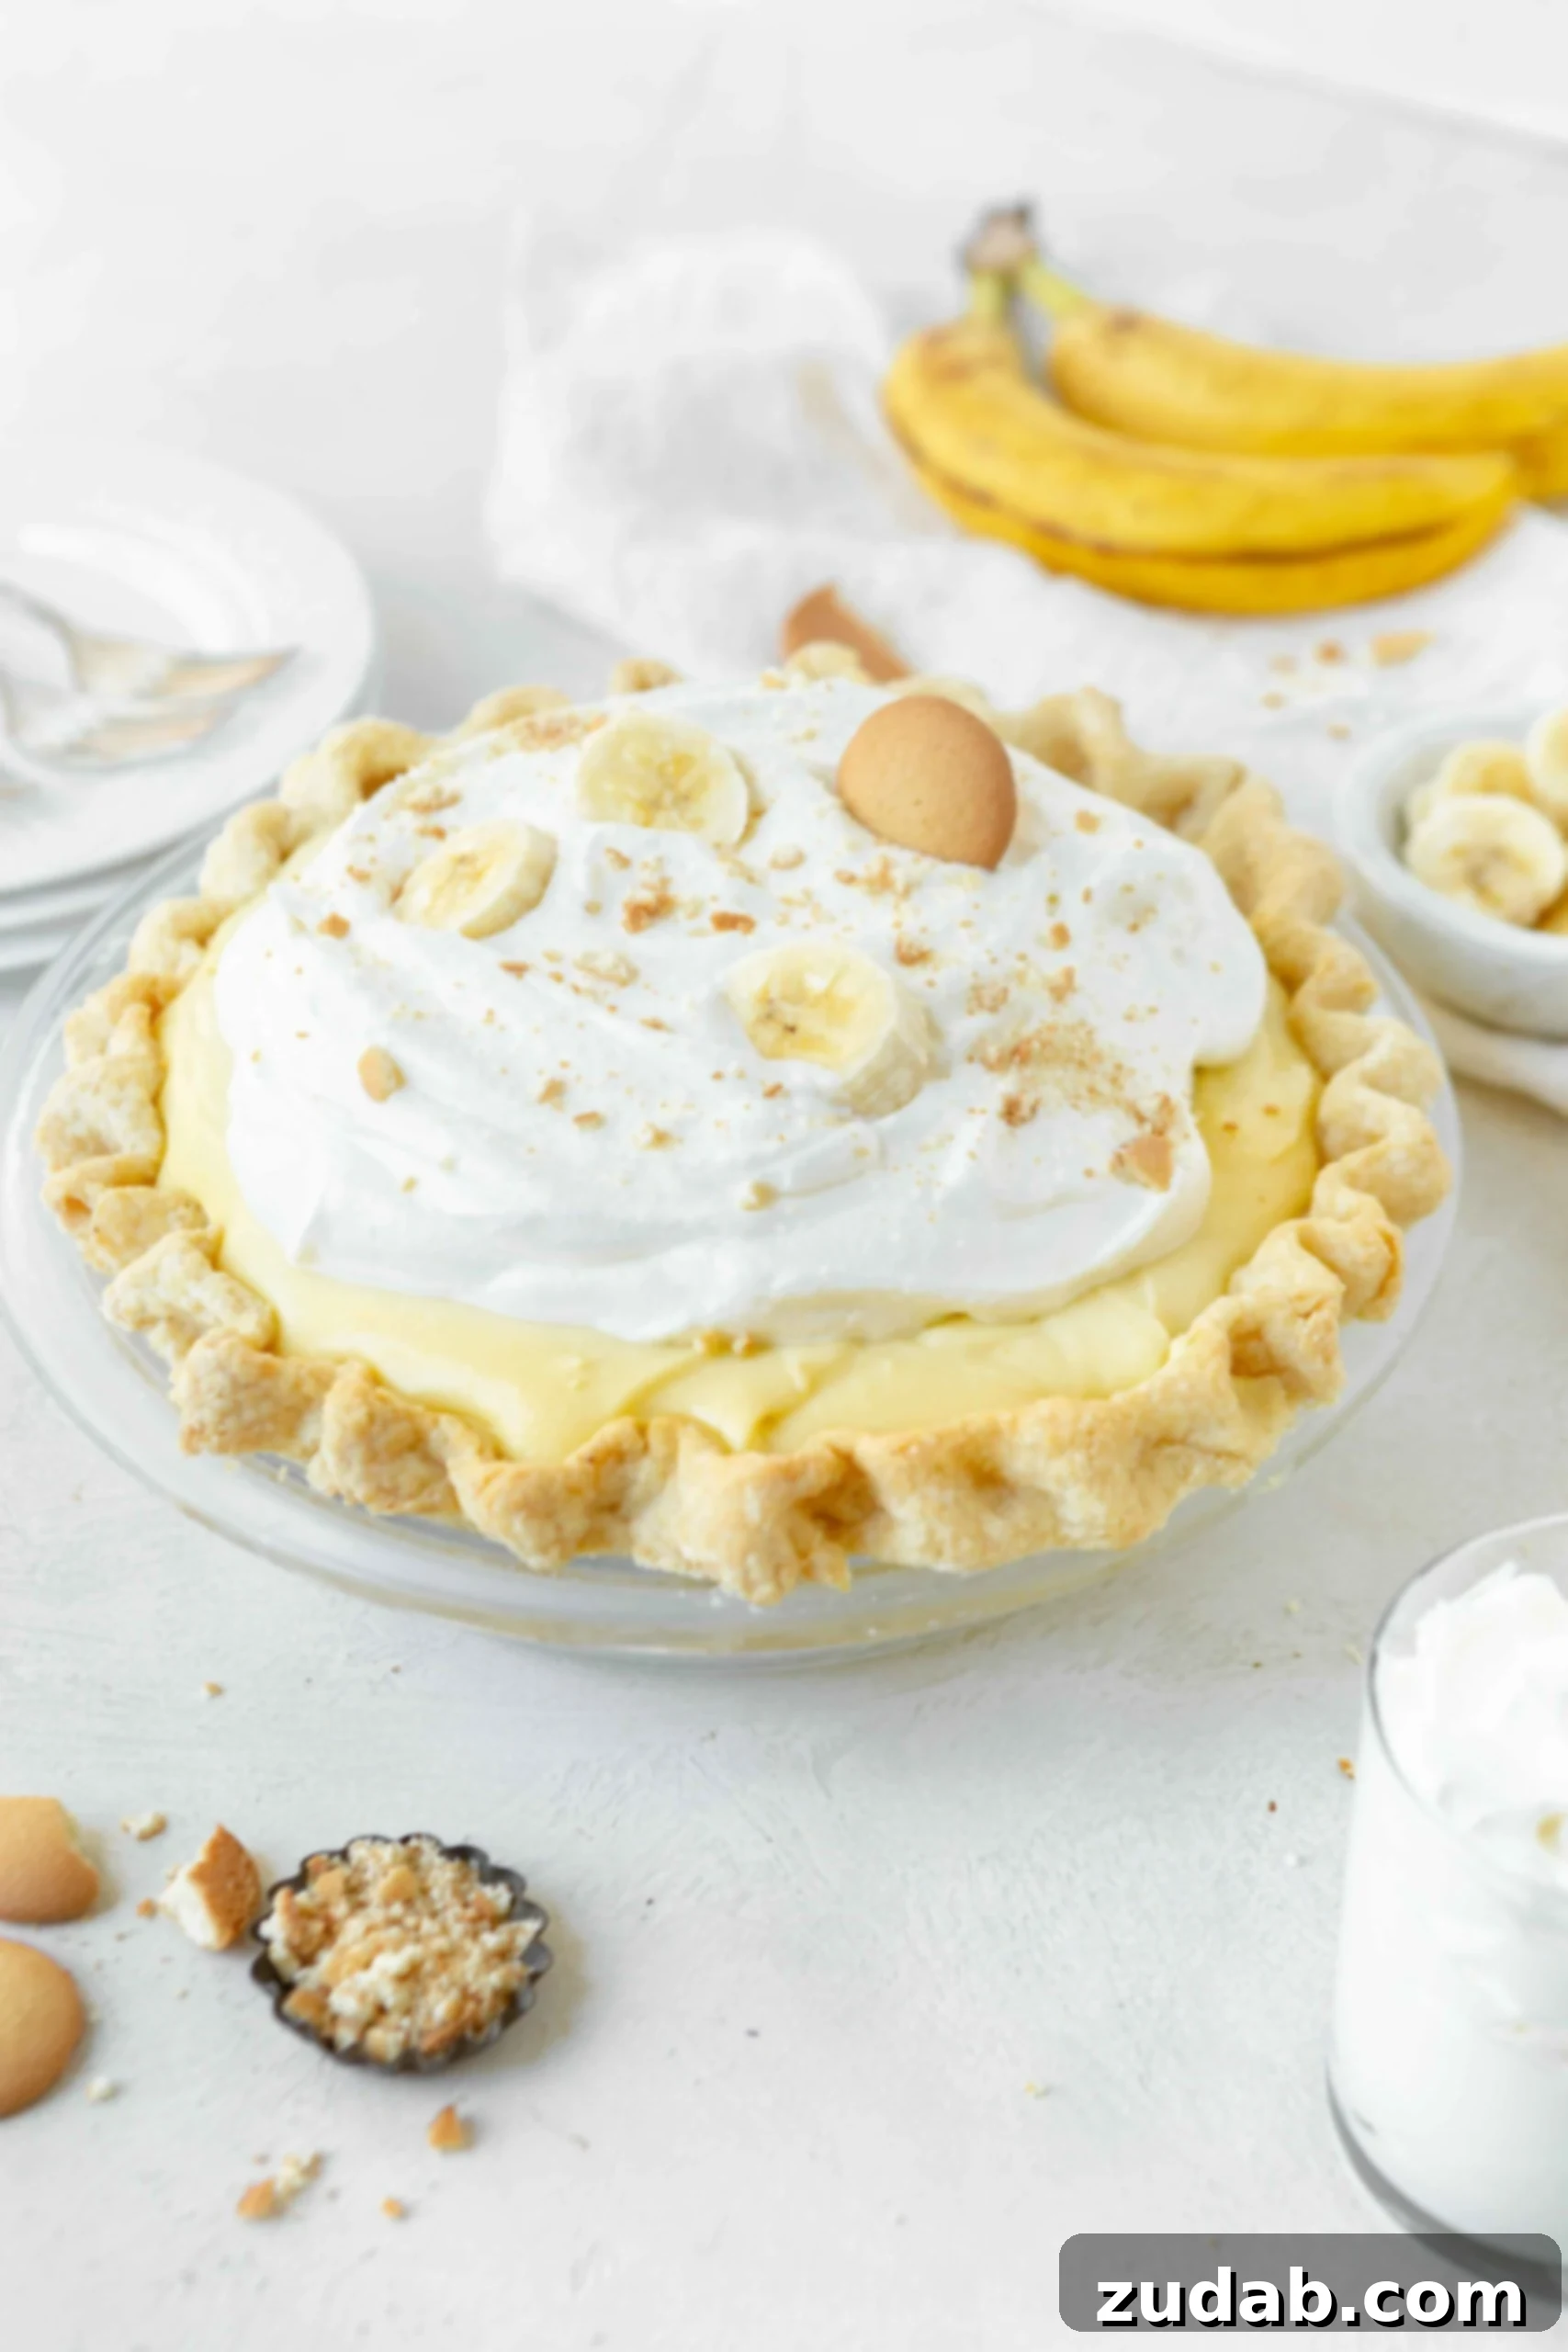
Unlock the unparalleled delight of a truly **homemade banana cream pie recipe**, crafted entirely **from scratch** to deliver an explosion of **real banana flavor** in every single bite. This isn’t just any pie; it’s a testament to culinary passion, boasting a filling so rich and intensely banana-flavored, you’ll wonder how you ever settled for anything less. Forget artificial essences and bland custard bases; our recipe focuses on a unique infusion method that captures the authentic, sweet essence of ripe bananas, elevating this classic dessert to an extraordinary level.
For too long, many banana cream pie recipes have fallen short, often lacking that vibrant, unmistakable banana presence. I’ve encountered countless versions that leave you searching for the star ingredient, resulting in a disappointing experience. That’s precisely why I embarked on a mission to create the ultimate rendition. Inspired by innovative techniques, particularly a brilliant infusion method, I finally cracked the code to achieving a deeply satisfying, natural banana flavor throughout the creamy filling. The result is a revelation, transforming what was once a good dessert into an absolute masterpiece.
Some might question the allure of pie as a dessert, but for those of us who appreciate its versatility and comforting embrace, it represents pure perfection. There’s something inherently satisfying about a flaky, buttery crust cradling a luscious, flavorful filling. This particular banana cream pie transcends expectations, offering a symphony of textures and tastes that will convert even the staunchest pie skeptics. Prepare yourself for a dessert that embodies tradition, innovation, and irresistible banana goodness.
Essential Ingredients for Your Ultimate Banana Cream Pie
Crafting this incredible banana cream pie doesn’t require an arsenal of exotic ingredients. Instead, it relies on foundational baking staples, elevated by the fresh, natural sweetness of ripe bananas. The beauty of this recipe lies in its simplicity, proving that extraordinary flavor often comes from quality ingredients treated with care. Below is a comprehensive list of what you’ll need to create this dreamy dessert, organized for clarity and ease of preparation.
For the Flaky All-Butter Pie Crust
A truly exceptional pie starts with a phenomenal crust. Our recommended all-butter pie crust provides that perfect tender, flaky texture that’s the hallmark of a gourmet homemade pie. While the full, step-by-step instructions for the crust are linked separately, here are the core ingredients that make it shine:
- All-Purpose Flour
- Unsalted Butter (cold, cubed)
- Granulated Sugar
- Salt
- Ice Water
For the Essential Egg Wash
An egg wash is a simple yet crucial step to ensure your pie crust achieves a beautiful golden sheen and, more importantly, remains crisp and prevents sogginess once the creamy filling is added. It creates a protective barrier, making every slice a delight.
- Large Egg
- Whole Milk
For the Signature Banana Infusion
This is where the magic happens! The banana infusion is the secret to capturing and concentrating that authentic, deep banana flavor that sets this pie apart. Using slightly freckled, ripe bananas ensures optimal sweetness and aroma for this vital step.
- Ripe Banana Slices (with brown freckles for best flavor, but not overly dark)
- Unsalted Butter (to prevent sticking and add a subtle caramelized note)
- Whole Milk (forms the primary liquid base for the custard)
- Heavy Cream (adds richness and a luxurious mouthfeel to the filling)
For the Luscious Pie Filling and Topping
The heart of your banana cream pie is this velvety smooth, intensely banana-flavored custard. Each ingredient plays a specific role in creating its irresistible texture and taste, while the toppings add visual appeal and a delightful crunch.
- Large Egg Yolks (crucial for a thick, rich, and creamy custard base)
- Granulated Sugar (for balanced sweetness)
- Salt (enhances all the flavors)
- Cornstarch (acts as the primary thickener, creating a pudding-like consistency. Alternatively, EZ Gel can be used for an even smoother finish)
- Pure Vanilla Extract (adds a warm, aromatic depth that complements banana beautifully)
- Unsalted Butter (contributes to the pie’s luxurious texture and rich flavor)
- Fresh Banana Slices (for layering within the pie and for elegant garnish on top)
- Fresh Whipped Cream or Stabilized Whipped Cream (the airy, cloud-like topping that crowns your pie)
- Nilla Wafers (crushed for a delightful textural contrast and classic garnish)
Detailed measurements for each ingredient can be conveniently found in the comprehensive recipe card located at the conclusion of this article.
Crafting Your Perfect Banana Cream Pie: A Step-by-Step Guide
Creating a stunning banana cream pie from scratch might seem daunting at first glance, but I assure you, it’s a remarkably straightforward and rewarding process. Don’t let the idea of making pie intimidate you! Our pie crust recipe is designed to be foolproof, and the rich pastry cream filling comes together with surprising ease. The most challenging part, I’ve found, is patiently waiting for the finished pie to properly chill and set in the refrigerator before you can indulge. But trust me, that wait is absolutely worth every moment. Here’s a detailed breakdown of each stage, ensuring your success from crust to creamy topping.
Crust Preparation: The Foundation of Flavor
A golden, flaky pie crust is the unsung hero of any great cream pie. Following these steps will ensure your crust is perfectly baked, crisp, and ready to hold its luscious filling without becoming soggy.
- Begin by preparing your all-butter pie crust dough according to the specific instructions provided in our dedicated recipe. Achieving the right consistency here is key to a tender final product.
- Once your dough is rolled out, carefully drape it over your rolling pin and gently unroll it into a 9-inch pie pan. Avoid stretching the dough, as this can lead to shrinkage during baking. Once in the pan, delicately press the dough into place and beautifully crimp the edges to create a decorative finish.
- To blind bake the crust (a crucial step for cream pies), lay a round piece of parchment paper directly onto the dough. Then, place a piece of aluminum foil on top of the parchment, pressing it firmly against the crust and over the crimped edges to protect them. Fill the foil-lined crust with pie weights, dried beans, or even popcorn kernels to prevent bubbling and ensure an even bake. Bake in a preheated oven at 425°F (220°C) for 15-20 minutes. While the crust bakes, whisk together one large egg and one tablespoon of milk to create your egg wash.
- Remove the crust from the oven. Carefully remove the parchment, foil, and pie weights. Immediately brush the entire crust, including the crimped edges, with the prepared egg wash. This step helps create a glossy finish and acts as a moisture barrier. Using a fork, gently “dock” the pie crust by poking several holes in the bottom and sides; this allows steam to escape, preventing puffing. Return the crust to the oven (without parchment, foil, or weights) and bake for another 10 minutes at 425°F (220°C), ensuring the crimped edges are protected from over-browning by covering them loosely with foil.
- Finally, reduce the oven temperature to 375°F (190°C) and continue to bake the crust until its center turns a rich golden-brown, a process that usually takes an additional 15-20 minutes. Once fully baked, remove from the oven and allow the crust to cool completely on a wire rack. This is crucial before adding any filling.
Banana Infusion: Unlocking Pure Flavor
This innovative step is the secret weapon for an intensely flavored banana cream pie. It extracts the deepest banana essence, ensuring every spoonful is bursting with natural sweetness.
- In a medium pot, melt one tablespoon of unsalted butter over medium heat. Add your sliced ripe bananas and stir gently to coat them in the butter. Cook the bananas for approximately 2 minutes, or until they have softened slightly. This brief sauté helps to caramelize their sugars and deepen their flavor.
- Next, pour in the whole milk and heavy cream, stirring gently to combine with the softened bananas.
- Continue to cook the mixture over medium heat, stirring occasionally, until it reaches a gentle boil. Allow it to boil for just 30 seconds to fully integrate the flavors. Immediately remove the pot from the heat, cover it with a lid, and let it sit undisturbed for 50 minutes. This allows the milk and cream to thoroughly infuse with the warm banana flavor, creating a rich and aromatic base for your custard.
Velvety Pie Filling: The Heart of the Pie
Once your banana infusion is complete, transforming it into a silky, smooth custard is the next exciting phase. This rich filling will be the star of your pie.
- In a large mixing bowl, combine the egg yolks, granulated sugar, and salt. Whisk these ingredients aggressively until the mixture becomes pale yellow and slightly thickened, almost ribbon-like. This aeration is important for the custard’s final texture. Then, add the cornstarch (or EZ Gel) and whisk again thoroughly to ensure there are no lumps.
- Carefully strain the warm banana-infused cream from the pot directly into the egg mixture through a fine-mesh colander. It is essential *not* to press on the bananas; you only want the liquid. Discard the strained banana solids, as their job of flavoring the cream is complete. Whisk the egg and milk mixture together vigorously until fully combined and smooth.
- Pour the entire mixture back into a clean, medium pot. Cook over medium heat, whisking continuously and diligently. This constant stirring is vital to prevent scorching and ensure a perfectly smooth, lump-free custard. Continue whisking until the mixture thickens significantly, reaching a pudding-like consistency and a temperature of 180°F (82°C), typically around 6 minutes.
- Remove the pot from the heat immediately. Stir in the vanilla extract and the remaining butter until the butter is completely melted and incorporated, adding a final touch of richness and aroma.
- Transfer the hot pudding to a clean bowl. To prevent a “skin” from forming on the surface (which can lead to lumps), place plastic wrap directly onto the surface of the pudding, pressing it down so it touches the entire custard. Allow the pudding to chill and come down to room temperature for about 2 hours, or until thoroughly cooled.
Assembly: Bringing it All Together
With your crust cooled and your filling perfected, it’s time for the grand assembly. This final stage creates the beautiful layers and prepares your pie for its chilling period.
- Begin by spreading a thin, even layer of the cooled banana pudding into the bottom of your blind-baked pie crust. This initial layer acts as a protective shield, helping to prevent the fresh banana slices from browning too quickly.
- Neatly arrange a layer of freshly sliced bananas (using approximately 3-4 large bananas) over the pudding. Aim for an even distribution to ensure banana in every bite.
- Carefully spoon the remaining banana cream filling over the banana slices, spreading it gently to cover them completely. Ensure you push the pudding all the way to the edges of the crust, creating a seal that further protects the bananas from oxidation and maintains the pie’s integrity.
- Cover the pie tightly with plastic wrap and refrigerate it for at least 5 hours, or ideally, overnight. This crucial chilling time allows the custard to set firmly and the flavors to fully meld, resulting in a perfectly sliceable and intensely flavorful pie.
- Just before serving, generously top the chilled pie with a luxurious layer of fresh whipped cream (or stabilized whipped cream for longer-lasting firmness). If desired, garnish with additional fresh banana slices and a sprinkle of crushed Nilla Wafers for extra texture and visual appeal.
- Slice, serve, and savor!
The Importance of Banana Ripeness for Superior Flavor
When it comes to banana cream pie, the ripeness of your bananas is not a minor detail—it’s paramount, especially for the infusion step. For optimal flavor and texture in the infused cream, select bananas that are beautifully freckled with small brown spots on their peels. This indicates a peak level of sweetness and aromatic development. However, it’s crucial that these bananas are not overly dark or soft, like those you might typically reserve for baking banana bread.
If your bananas are too ripe, their texture becomes excessively mushy, and their flavor can turn overly sweet, almost bordering on a sour or fermented taste within the delicate custard. This imbalance can drastically alter the nuanced profile of your pie, resulting in an undesirable outcome. Strive for that perfect freckled stage to achieve a sweet, creamy, and truly exquisite banana essence in your filling.
Essential Tools to Master Your Banana Cream Pie
Having the right tools at hand can significantly streamline your baking process and contribute to a more enjoyable experience. While not all are strictly necessary, these items are highly recommended for making this homemade banana cream pie with ease and precision:
- Rolling Pin: Essential for achieving a uniformly thin and flaky pie crust.
- Pie Dish: A sturdy 9-inch pie plate is fundamental for baking and serving.
- Pie Weights: Crucial for blind baking your crust, preventing it from shrinking or bubbling.
- Sharp Knife: For precise slicing of bananas and butter.
- Whisk: Indispensable for incorporating ingredients smoothly and thickening the custard.
- Pastry Brush: For applying the egg wash evenly onto your pie crust.
- Fine-Mesh Colander/Strainer: Critical for straining the banana infusion, ensuring a silky-smooth custard.
- Measuring Cups and Spoons: For accurate ingredient measurements, vital for baking success.
- Medium and Large Pots: For the banana infusion and cooking the custard.
- Large Mixing Bowls: For whisking ingredients.
- Plastic Wrap: For covering the custard to prevent a skin from forming.
Expert Tips for a Flawless Banana Cream Pie
Achieving banana cream pie perfection involves a few tried-and-true techniques that can elevate your results. Here are some essential notes and tips to guide you:
- **Mastering the Crust:** When preparing the pie crust, precision with ice water is key. I find it helpful to fill a glass measuring cup about halfway with ice cubes, then fill the rest with cold water. This ensures the water remains icy cold. Use a tablespoon to measure out the exact amount needed for your dough, adding it gradually to achieve the perfect consistency without overworking the butter.
- **Advance Preparation:** For convenience, your homemade pie crust dough can be prepared ahead of time and frozen for up to two months. When ready to use, simply allow it to thaw completely on the counter before attempting to roll it out. This makes pie-making on a busy day much more manageable.
- **Preventing a Custard Skin:** As mentioned in the instructions, placing plastic wrap directly onto the surface of the hot custard as it cools is paramount. This prevents an undesirable skin from forming, which can introduce lumps into your otherwise silky-smooth filling.
- **Chilling is Critical:** Do not rush the refrigeration step. A minimum of 5 hours, or preferably overnight, allows the custard to properly set and the flavors to fully develop and meld. This ensures clean, firm slices and an optimal eating experience.
- **Stabilized Whipped Cream:** If you plan to make your pie ahead of time or if it will be sitting out for an extended period, consider using a stabilized whipped cream recipe for your topping. This will help it hold its shape and prevent weeping, keeping your pie looking fresh and beautiful.
From Scratch Banana Cream Pie
Ingredients
- 1 All Butter Pie Crust
Egg Wash
- 1 Egg
- 1 Tablespoon Milk
For the Banana Infusion
- 1 Tablespoon Butter
- 2 ¼ Cups 1/2″ Thick Banana Slices
- 1 ¾ Cups Whole Milk
- 3/4 Cup Heavy Cream
For the Filling
- 6 Large Egg Yolks
- 3/4 Cup Sugar
- 1/4 teaspoon Salt
- 6 Tablespoons EZ Gel, + 2 teaspoon, or 3 Tablespoons of cornstarch+ 1 teaspoon
- 2 teaspoons Vanilla
- 2 ½ Tablespoons Butter
- 3 Large Bananas
- Fresh Whipped Cream , or stabilized recipe below
- Stabilized Whipped Cream
- 2 Tablespoons Crushed Nilla Wafers
- Any remaining banana slices for garnish
Instructions
-
Prepare the pie crust per instructions.
-
Fold the rolled out dough over the rolling pin and unroll the dough into the 9″ pie pan without stretching. Press into pie pan and crimp edges.
-
Lay a round of parchment paper onto the crust. Now press tin foil onto the paper so that it doesn’t stick to the crust, pushing it against the edge of the crust and over the crimped edges and fill with pie weights, beans or popcorn kernels. Bake at 425 degrees for 15-20 minutes. Meanwhile, whisk together the egg wash.
-
To keep the crust from getting soggy and make it shiny, take the pie out and brush the crust with an egg wash (including the crimped edges) and then using a fork, dock the pie crust by poking holes. Cover the crimped edges in foil and bake another 10 minutes at 425F without the parchment, foil and pie weights.
-
Then reduce the temperature down to 375 degrees and bake until the center is golden, about 15-20 minutes.
For the Banana Infusion
-
Add 1 tablespoon of butter to a medium pot. Add the sliced bananas and stir to coat in butter. Cook for about 2 minutes or until softened. Add the whole milk and heavy cream, stirring gently.
-
Cook until the mixture comes to a boil and then cook for 30 seconds. Turn off the heat and move off of the burner, adding a lid and allow to sit for 50 minutes.
For the Filling
-
In a large bowl, add the egg yolks, sugar and salt, whisking aggressively to combine until it looks a pale yellow. Add the EZ gel and whisk again.
-
Using a colander, strain the hot milk into the eggs without pressing on the bananas and then discard the bananas. Whisk the eggs and milk together and then dump everything into a clean pot over medium heat and continue whisking.
-
Cook, whisking continually until 180 degrees and thickened into a pudding, about 6 minutes.
-
Remove from heat and add vanilla and butter and stir until butter is all melted.
-
Place plastic wrap over the bowl and onto the pudding to prevent a skin from forming and chill to bring down to room temperature, about 2 hours.
Assembly
-
Spread a layer of the pudding onto the bottom to help prevent brown bananas. Slice 3-4 Bananas onto the pudding. Fill with remaining filling and smooth out all over the crust being sure to seal around the edges, cover and refrigerate at least 5 hours, or up to overnight. Top with fresh whipped cream or stabilized whipped cream and extra bananas and nilla wafer crumbs and serve!
Recipe Notes
Pie crust can be made ahead and frozen for up to 2 months. Allow to thaw completely on the counter before rolling
Nutrition
Nutrition information is automatically calculated, so should only be used as an approximation.
I have always been a devoted fan of banana cream pie, but this particular **banana cream pie recipe** transcends all expectations! The authentic banana flavor permeates every creamy bite, perfectly complemented by a light, buttery, and exquisitely flaky crust that tastes like it came straight from a dream. For anyone who thinks they don’t like pie, I urge you to try this recipe – you might just find yourself converted!
Don’t miss out on more delightful recipes! REMEMBER TO SUBSCRIBE TO our FREE Oh Sweet Basil NEWSLETTER AND RECEIVE EASY RECIPES DELIVERED INTO YOUR INBOX EVERY DAY!
When you try a recipe, please use the hashtag #ohsweetbasil on INSTAGRAM for a chance to be featured in our stories! FOLLOW OH, SWEET BASIL ON FACEBOOK | INSTAGRAM | PINTEREST | TWITTER FOR ALL OF OUR LATEST CONTENT, RECIPES AND STORIES.