
Craft Your Own Classic: The Ultimate Guide to Homemade Twix Candy Bars
There’s something uniquely satisfying about recreating beloved treats right in your own kitchen. While store-bought candy bars hold a special place in our hearts, the joy of biting into a homemade version, crafted with love and fresh ingredients, is simply unparalleled. And when it comes to iconic candy, few can rival the delightful combination of crisp shortbread, gooey caramel, and rich chocolate found in a classic Twix bar. Today, we’re diving deep into the art of making your very own Homemade Twix Candy Bars – a recipe so delicious, you might never go back to the original!
For many, a candy bar is a rare indulgence, often reserved for movie nights or special occasions. While we often lean towards warm, freshly baked cookies from the oven, there are moments when only a candy bar will do. And when that craving strikes, especially for a Twix, knowing you can whip up a batch of these glorious homemade versions makes the experience even sweeter. Our journey to creating these perfect bars began exactly that way: a simple movie night, a shared Twix, and a sudden realization – “We can absolutely make these ourselves!”
The quest to replicate that perfect balance of textures and flavors became an exciting challenge. After a few weeks of planning and experimenting, we finally achieved success. While the very first batch, which was quickly photographed due to time constraints, might not have been the most aesthetically flawless, the taste was undeniably spot-on, just like the Twix bars we all know and adore. This recipe proves that sometimes, taste triumphs over perfect presentation, especially when it comes to a treat this delicious. Prepare to impress your friends and family – or simply treat yourself – with these incredibly satisfying Homemade Twix Candy Bars.
Why Homemade Twix are a Game Changer
Beyond the sheer satisfaction of creating something from scratch, making your own Twix bars offers several advantages. You control the quality of ingredients, ensuring freshness and avoiding artificial additives often found in commercial candies. Plus, there’s an undeniable sense of accomplishment that comes with presenting a tray of these golden beauties. They’re also fantastic for entertaining, especially for game days or gatherings, as they can be made in advance and easily scaled to feed a crowd. Imagine the delight on everyone’s faces when they realize they’re enjoying your homemade take on a classic favorite! These bars are surprisingly easy to make, and we bet they’ll be devoured in no time.
Mastering the Layers: Tips for Perfect Twix Bars
Crafting the perfect Homemade Twix involves three distinct layers: the buttery shortbread base, the rich caramel filling, and the smooth chocolate coating. Each component plays a crucial role in achieving that iconic Twix experience. Here are some essential tips to ensure your candy bars turn out beautifully:
The Shortbread Foundation: Crispness is Key
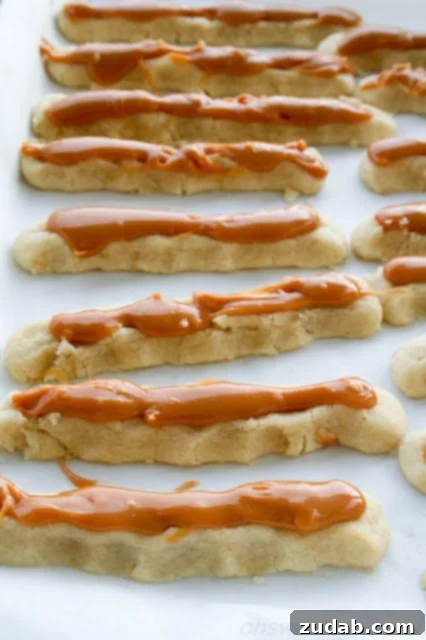
The shortbread layer is the bedrock of your Twix bars. It needs to be firm enough to hold the caramel and chocolate, yet crumbly and buttery with every bite. The key to achieving the desired crispness lies in the baking process and, optionally, chilling the dough. We recommend chilling the shortbread dough for at least an hour before slicing and baking. This step helps the butter solidify, preventing the dough from spreading too much in the oven and resulting in a crispier, more defined shortbread. While some might skip this step for quicker preparation, the extra chill time truly elevates the texture. When rolling out your dough, aim for a thickness of about 1/4 to 1/2 inch. Creating a very small, shallow channel along the top of each shortbread stick before baking can also be helpful; this subtle indentation provides a perfect little “trough” for the caramel to settle into, ensuring it stays neatly in place.
Working with Caramel: Speed and Temperature
The caramel layer adds that signature chewy sweetness that Twix fans adore. When melting your caramel squares with evaporated milk, it’s important to work efficiently. Caramel can cool and harden quickly, so be prepared to move with a bit of speed. Heat the mixture in a microwave-safe bowl in short 30-second intervals, stirring thoroughly after each interval, until it’s smooth and pourable. If your caramel starts to thicken or harden as you’re working, simply pop it back into the microwave for a few seconds to soften it again. After melting, allow the caramel to cool for just a minute or two before drizzling it onto the shortbread. This slight cooling period helps the caramel maintain its shape and prevents it from being too runny. Use a teaspoon to scoop and drizzle the caramel, and don’t hesitate to use your finger (carefully, it might still be warm!) to guide it into place along the shortbread sticks.
The Chocolate Coating: Achieving a Smooth Finish
The final layer is the chocolate coating, which encases the shortbread and caramel in a rich, indulgent shell. The temperature of your melted chocolate is paramount for a smooth, even coating and to ensure it sets properly without melting the caramel or softening the shortbread. While the recipe uses almond bark for ease, which melts beautifully, if you opt for regular chocolate, consider tempering it for a professional, glossy finish and a satisfying snap. However, for most home bakers, simply melting the chocolate in a microwave-safe dish (an 8×8 Pyrex dish works wonderfully for dipping) until smooth, stirring occasionally, will suffice. The most crucial tip here is to let the melted chocolate cool slightly before dipping your assembled bars. If the chocolate is too hot, it can cause the shortbread and caramel layers to separate or the caramel to become excessively soft, making dipping difficult and messy. Once your bars are ready for their chocolate bath, use a fork to dip them, ensuring they are fully coated. Gently tap off any excess chocolate before placing them on parchment paper to harden.

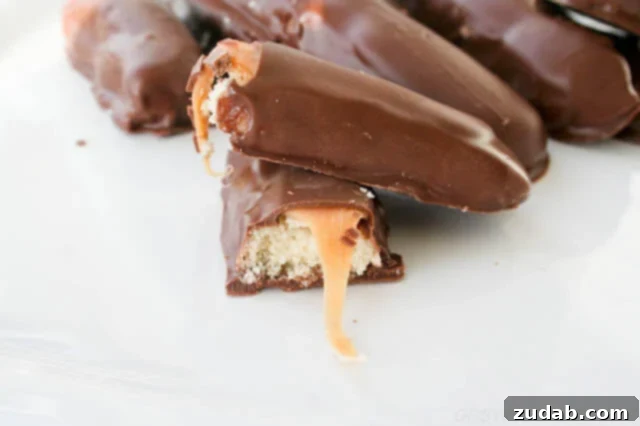
They truly look pretty fantastic, don’t they? The crisp shortbread, the chewy caramel, and the smooth chocolate all come together in perfect harmony. While personal preference might lead you to chill the shortbread longer for an extra-crisp texture, rest assured that these homemade delights will be a hit regardless. Everyone who tries them will surely agree!
Frequently Asked Questions About Homemade Twix Bars
To help you perfect your Homemade Twix Candy Bars, let’s address some common questions about key ingredients and techniques.
Is Shortbread Considered a Cookie? Exploring the Delightful “Biscuit”
Historically and traditionally, shortbread is classified as a type of biscuit, particularly in its country of origin, Scotland. The distinction between a “cookie” and a “biscuit” often varies by region. In the UK, “biscuit” refers to what Americans call a “cookie,” while “cookies” are typically larger, chewier versions. Shortbread’s unique texture comes from its high butter content and simple ingredient list. Traditional Scottish shortbread is made from a classic ratio of one part white sugar, two parts butter, and three parts flour, often using oat flour or a combination with all-purpose flour. This rich composition gives it a distinct crumbly, melt-in-your-mouth texture that sets it apart from many other types of cookies or biscuits. Its rich history dates back to the 12th century, and it has evolved from a medieval biscuit bread into the cherished sweet treat we know today, often enjoyed around holidays and special occasions.
Can You Substitute Salted Butter for Unsalted Butter in Baking?
While it’s always best practice to use the specific type of butter called for in a recipe, especially in baking where precise measurements are crucial for chemical reactions, you can sometimes substitute salted butter for unsalted butter with a minor adjustment. The primary difference between salted and unsalted butter is, as the name suggests, the addition of salt. Unsalted butter allows bakers complete control over the salt content in their recipes, which is important because salt enhances flavor and can impact the dough’s structure. If your recipe calls for unsalted butter and you only have salted on hand, simply decrease the amount of added salt in the recipe by 1/4 teaspoon for every 1/2 cup (or one stick) of salted butter used. Be mindful that the salt content in salted butter can vary between brands, so this is an approximation. For recipes where butter is a dominant flavor or structural component, like shortbread, using unsalted butter for better control is always recommended.
How Should I Store Homemade Twix Candy Bars?
Once your Homemade Twix Candy Bars have fully set, store them in an airtight container at room temperature in a cool, dry place for up to one week. If your kitchen tends to be warm, or for extended freshness, you can store them in the refrigerator for up to two weeks. For longer storage, these candy bars freeze beautifully! Place them in a single layer on a parchment-lined baking sheet and freeze until solid, then transfer them to an airtight freezer-safe container or bag. They can be frozen for up to 3 months. Thaw at room temperature before enjoying.
Can I Experiment with Different Chocolate Coatings?
Absolutely! While milk chocolate almond bark provides a classic Twix experience, feel free to experiment with different types of chocolate. Dark chocolate would offer a richer, more intense flavor that perfectly complements the sweet caramel and shortbread. White chocolate could also be a fun variation, perhaps with a sprinkle of nuts or sprinkles for added texture and color. You could even try a combination, drizzling dark chocolate over a milk chocolate coating for a gourmet touch.
Homemade Twix Candy Bars Recipe
Homemade Twix Candy Bars

Ingredients
Shortbread
- 4 Cups All Purpose Flour
- 1 Pinch Salt
- 1 1/2 teaspoon Vanilla
- 1 Cup Sugar
- 4 Sticks Butter, 2 cups, unsalted and softened
Caramel
- 2 Cups Caramel Squares, or 1 Bag
- 2 Tablespoons Evaporated Milk
Chocolate
- 1 Package Almond Bark, Milk Chocolate
Instructions
For the Shortbread
-
Place all of the shortbread ingredients together in the bowl of a standing mixer.4 Cups All Purpose Flour, 1 Pinch Salt, 1 1/2 teaspoon Vanilla, 1 Cup Sugar, 4 Sticks Butter
-
Mix on low speed until the dough just starts to come together, then increase to medium speed until a cohesive ball of dough forms.
-
Flatten the dough into a disk, wrap it tightly in plastic wrap (saran wrap), and place it in the fridge for 1 hour. (You can skip this step if you prefer a less crisp shortbread, but chilling is recommended for best results).
-
Roll out the chilled dough to approximately 1/4 to 1/2 inch thick and slice it into “sticks” resembling the shape of a Twix bar. Creating a very small, shallow channel along the top of each stick can help hold the caramel in place.
-
Bake the shortbread sticks at 350°F (175°C) for 10-12 minutes, or until the edges are lightly golden.
-
Allow the shortbread to cool completely on a wire rack before proceeding to the next step.
For the Caramel
-
Combine the caramel squares and evaporated milk in a microwave-safe bowl. Heat in 30-second intervals, stirring each time, until the caramel is smooth and fully melted.2 Cups Caramel Squares, 2 Tablespoons Evaporated Milk
-
Let the caramel cool for about a minute. This helps it thicken slightly for easier handling.
-
Using a teaspoon, scoop a small amount of caramel and drizzle it down the length of each cooled shortbread stick. You can use your finger to gently guide the caramel to fully cover the top of the shortbread.
-
Allow the caramel to set and harden for a few minutes, or until it’s firm and no longer sticky to the touch. This can be sped up by placing the bars in the refrigerator for 10-15 minutes.
For the Chocolate
-
Melt the almond bark in a microwave-safe dish (an 8×8 Pyrex dish is ideal for easier dipping) in 30-second intervals, stirring occasionally, until smooth.1 Package Almond Bark
-
Let the melted chocolate cool for a minute or two. This prevents it from melting the caramel layer and helps it adhere better to the bars. Carefully drop each caramel-topped shortbread bar into the chocolate.
-
Use a fork to fully immerse the candy bar in chocolate. Gently lift the bar, allowing any excess chocolate to drip off through the tines of the fork.
-
Place the chocolate-coated bars on a parchment-lined baking sheet. Let them sit at room temperature or chill them in the refrigerator until the chocolate has fully hardened.
-
Enjoy your perfectly crafted Homemade Twix Candy Bars!
-
These can be stored in an airtight container at room temperature or frozen for longer enjoyment.
Recipe Notes
Nutrition
Nutrition information is automatically calculated, so should only be used as an approximation.
Like this? Leave a comment below!
Before we conclude, we wanted to share a quick tip for savvy shoppers. When planning your next grocery haul, especially for a big event like a game day or holiday feast, remember to explore cash-back credit card options. For example, cards offering 3% back on grocery purchases can lead to significant savings over time. Just imagine how much you could save on those Superbowl party essentials! It’s a simple way to make your budget work harder for you, allowing for more delightful homemade treats like these Twix bars.
Embrace the Joy of Homemade
Making your own Twix candy bars is more than just following a recipe; it’s an experience that brings a little magic into your kitchen. From the comforting aroma of baking shortbread to the satisfying process of drizzling caramel and coating in chocolate, each step is a joy. These Homemade Twix Candy Bars are a testament to the fact that sometimes, the best treats are those made with your own hands. So, gather your ingredients, clear your schedule, and get ready to create a truly unforgettable candy bar. Your taste buds (and your family!) will thank you for it!