
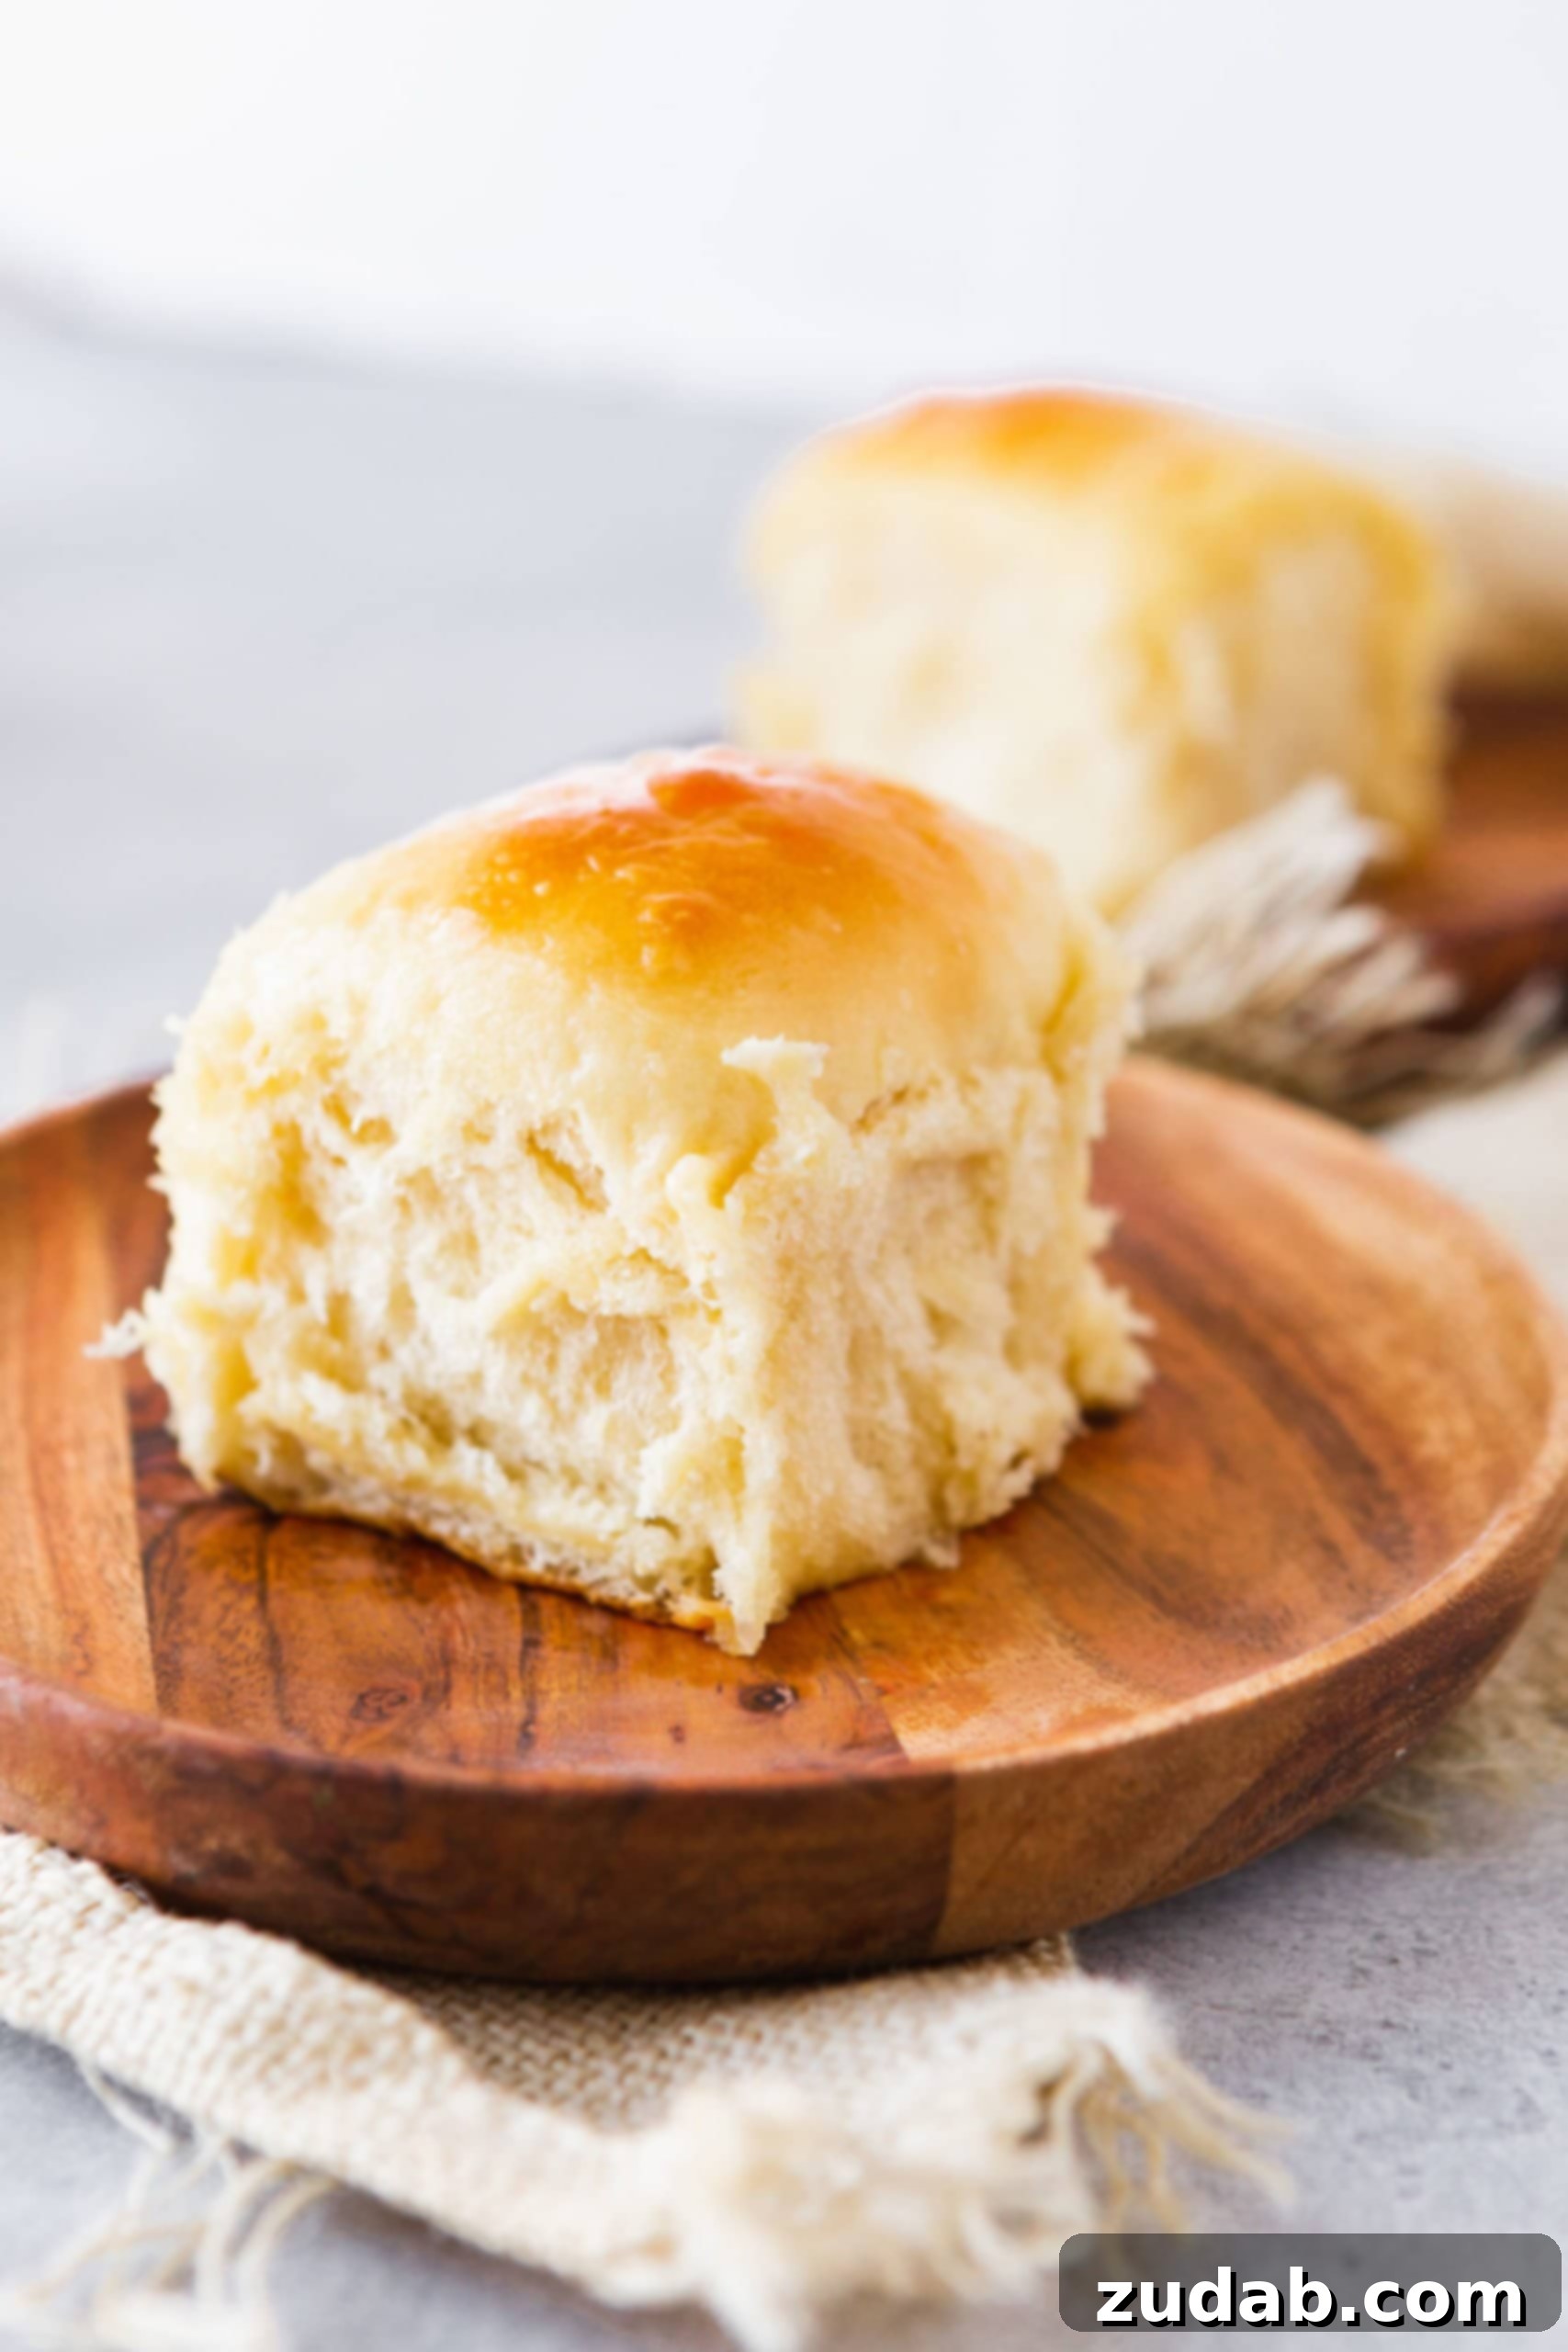
Welcome to the ultimate guide for creating irresistibly fluffy, subtly sweet, and wonderfully moist **Hawaiian rolls** right in your own kitchen! These delightful rolls, infused with the tropical essence of pineapple juice, stand out as the softest and most flavorful you’ll ever bake. Forget store-bought versions; once you experience the melt-in-your-mouth texture of homemade Hawaiian sweet rolls, there’s no turning back.
Beyond being a perfect standalone bread for any meal, these versatile rolls are exceptional for crafting gourmet sliders. Imagine them cradling savory fillings in our Hawaiian turkey burger sliders, serving as the foundation for hearty French dip sliders, or elevating classic cheeseburger sliders. Their unique sweetness and tender crumb complement a wide array of flavors, making them a staple for entertaining or everyday indulgence.
Essential Ingredients for Perfect Hawaiian Rolls
While these rolls boast an exotic name and a distinct flavor profile, their preparation is surprisingly similar to classic dinner rolls, with just a few key additions that make all the difference. Gathering your ingredients is the first step towards baking success. Here’s a detailed look at what you’ll need to create these culinary masterpieces:
For the Hawaiian Rolls Dough:
- Instant Yeast: This is the powerhouse that gives our rolls their incredible rise and airy texture. Instant yeast is convenient as it can be mixed directly with dry ingredients, often skipping the need for proofing.
- Milk: Provides richness and moisture, contributing to the rolls’ tender crumb. Whole milk is often preferred for its fat content, which enhances flavor and texture, but other milk types can be used.
- Water: Essential for hydrating the dough and activating the yeast. The temperature of the water is crucial for yeast activity, typically lukewarm.
- Pineapple Juice: The secret ingredient that imbues these rolls with their signature subtle sweetness and tropical tang. It also plays a vital role in making the rolls exceptionally fluffy and moist.
- PRO TIP: Always use *canned* pineapple juice, not fresh. Fresh pineapple juice contains bromelain, an enzyme that can break down gluten proteins, preventing your dough from rising properly and resulting in dense, heavy rolls. Canned juice, however, has been pasteurized, inactivating this enzyme and ensuring a perfect rise.
- Granulated Sugar: Feeds the yeast, aids in browning the crust, and contributes to the rolls’ characteristic sweetness.
- Honey: Adds another layer of complex sweetness and a golden hue to the rolls, enhancing their overall appeal and moisture.
- Unsalted Butter: Incorporates rich flavor and tenderness into the dough. Using unsalted butter allows you to control the total sodium content in your recipe.
- Fine Sea Salt: Balances the sweetness, enhances all the flavors, and helps regulate yeast activity. Fine sea salt dissolves easily and distributes evenly throughout the dough.
- Vegetable Oil: Adds additional moisture and helps keep the rolls soft and pliable. It also prevents the dough from sticking during the mixing process.
- Evaporated Milk: This concentrated milk product provides extra richness and a unique depth of flavor that sets Hawaiian rolls apart. It contributes to their golden color and velvety texture.
- Egg: Acts as a binder, adds richness, structure, and contributes to the beautiful golden-brown color of the crust. A large, whisked egg is typically used.
- All-Purpose Flour: The primary structural component of the rolls. The amount needed can vary slightly depending on humidity and how the other ingredients are measured, so it’s often added gradually.
For the Irresistible Honey Butter Glaze:
- Butter: Forms the base of the glaze, adding a luscious, buttery finish.
- Honey: Blended with butter, it creates a sweet, shiny glaze that deeply infuses the rolls with flavor, making them even more decadent.
Exact measurements for each ingredient, along with detailed step-by-step instructions, can be found in the comprehensive recipe card located at the conclusion of this post. This ensures you have all the precise information at your fingertips for baking perfection.
What Can You Substitute for Evaporated Milk?
If evaporated milk isn’t readily available or you prefer to make your own, there are excellent alternatives to ensure your Hawaiian rolls are just as rich and flavorful:
- Homemade Evaporated Milk: You can easily create your own by simmering 2 ¼ cups of regular milk (whole milk works best for richness) in a saucepan over medium-low heat. Stir occasionally to prevent scorching, and continue simmering until the volume is reduced to 1 cup. This process concentrates the milk, mimicking the properties of store-bought evaporated milk.
- Half-and-Half and Whole Milk Blend: A combination of half-and-half and whole milk can also serve as a good substitute. While the exact ratio can vary, a good starting point is to use slightly less liquid overall than the recipe calls for, or adjust the flour content slightly to achieve the right dough consistency, as this blend might be less concentrated than evaporated milk.
The Unique Sweetness and Fluffiness of Hawaiian Rolls
As mentioned, these rolls distinguish themselves from typical dinner rolls through a few special additions. The delicate sweetness that defines these Hawaiian rolls comes primarily from two key ingredients in the dough: pineapple juice and honey. This combination creates a subtle yet incredibly satisfying sweetness that is neither overpowering nor cloying, making them perfectly balanced.
Beyond sweetness, the pineapple juice also works wonders on the texture. Its natural acidity and moisture-retaining properties contribute significantly to making these rolls exceptionally fluffy, light, and wonderfully moist. The result is a roll that feels like a soft, airy cloud, a true indulgence with every bite. The yeast interacts beautifully with the sugars in both the honey and pineapple juice, promoting a robust rise and contributing to the open, tender crumb that is characteristic of authentic Hawaiian sweet rolls.
How to Master Homemade Hawaiian Rolls: A Step-by-Step Guide
Crafting these delectable Hawaiian rolls is a rewarding experience, transforming simple ingredients into a truly heavenly bread. Follow these detailed steps for guaranteed success:
Making the Hawaiian Rolls Dough:
- Scald the Milk: Begin by warming the milk in a medium saucepan over medium heat. Heat until small bubbles start to form around the edges, indicating it’s just beginning to foam. It’s crucial not to let it boil vigorously. Scalding denatures certain proteins that can inhibit gluten development, resulting in a softer, more tender roll.
- Infuse Flavors and Cool: Remove the saucepan from the heat. Add the unsalted butter, water, pineapple juice, sugar, and honey to the warm milk. Stir continuously until the butter has completely melted and all ingredients are well combined. Allow this mixture to cool down to a lukewarm temperature (around 105-115°F or 40-46°C). This temperature is ideal for activating yeast without killing it.
- Activate the Yeast: Once the liquid mixture is lukewarm, sprinkle the instant yeast evenly over its surface. Gently stir to combine. Carefully pour the entire mixture into the bowl of a stand mixer. Let it rest for 5 to 10 minutes. During this time, the yeast should activate, creating a foamy layer on top, which indicates it’s alive and ready to work.
- Combine Wet Ingredients: Into the stand mixer bowl, add the remaining wet ingredients: vegetable oil, fine sea salt, evaporated milk, and the whisked large egg. Mix thoroughly with a paddle attachment until all components are fully integrated.
- Form the Dough: Now it’s time to introduce the flour. Start by adding 8 cups of all-purpose flour to the wet mixture. Switch to the dough hook attachment on your stand mixer and mix on low speed until the dough begins to come together. The dough will likely still be quite sticky. Gradually add the remaining flour, about half a cup at a time, until the dough forms a soft, slightly sticky ball that pulls away from the sides of the bowl and gathers around the dough hook. You might not need all 13 cups of flour; the goal is a supple dough, not a dry one. Continue kneading for 7-10 minutes on medium-low speed until the dough is smooth and elastic.
- First Rise (Bulk Fermentation): Remove the dough ball from the mixer bowl. Lightly grease the inside of the bowl with a little vegetable oil, return the dough to the bowl, and turn it once to coat. Cover the bowl tightly with plastic wrap or a clean kitchen towel. Place it in a warm, draft-free spot (like a slightly warmed oven that has been turned off, or near a sunny window) and let it rise for 1 to 1.5 hours, or until it has visibly doubled in size. This crucial step allows the yeast to produce gases, developing flavor and texture.
- Shape the Rolls: Once the dough has doubled, gently punch it down to release the air. Lightly flour your work surface. Turn the dough out onto the floured surface. Pull off uniform-sized chunks of dough, about 2-3 tablespoons each, and gently shape them into smooth, round balls. Aim for consistency in size to ensure even baking. Arrange the shaped dough balls closely together on a greased baking sheet or in a 9×13 inch baking dish.
- Second Rise (Proofing): Cover the baking sheet or dish with a clean cloth. Let the shaped rolls rise again in a warm, draft-free place for another 30-45 minutes, or until they have nearly doubled in size once more and appear puffy. While the rolls are undergoing their second rise, prepare the honey butter glaze (instructions below). Once risen, lightly brush the tops of the rolls with a generous layer of the melted honey butter.
- Bake to Golden Perfection: Preheat your oven to 350°F (175°C). Bake the rolls for 20-25 minutes, or until they are beautifully golden brown on top and cooked through. The internal temperature should register around 200°F (93°C).
- Final Butter Glaze: As soon as you remove the rolls from the oven, brush their tops generously with the remaining honey butter. This adds a final burst of sweet, buttery flavor and creates a lovely sheen. Serve warm and enjoy!
Preparing the Honey Butter Glaze:
- Melt and Combine: In a small saucepan over medium heat, combine the butter and honey. Stir continuously until both ingredients have melted together into a smooth, fragrant glaze. Set aside until needed. This simple glaze is the perfect finishing touch, adding a sweet, rich aroma and a beautiful shine to your baked rolls.
Remember, all these instructions are provided in further detail within the comprehensive recipe card located at the end of this article.
Delicious Pairings: What to Serve with Hawaiian Rolls
The versatility of homemade Hawaiian rolls makes them an ideal accompaniment to an astonishing variety of dishes. Their sweet and fluffy nature perfectly complements both savory and sweet meals. While they are delightful on their own, here are some of our favorite culinary companions:
- Hawaiian Pulled Pork: My absolute favorite meal pairing! The rich, savory flavors of slow cooker Kalua pork find a perfect counterpoint in the sweetness of these rolls. Serve it alongside a refreshing tropical fruit salad and fragrant coconut rice for a truly authentic Hawaiian feast.
- Holiday Feasts: These rolls are a must-have for special occasions. They pair wonderfully with festive meats like honey baked ham, where their sweetness echoes the glaze, or with a luxurious prime rib, adding a light, contrasting element.
- Hearty Soups and Stews: For a comforting meal, Hawaiian rolls are excellent for soaking up the rich broths of dishes like Zuppa Toscana, adding a touch of sweetness to a savory bowl.
- Grilled Chicken and Fish: Serve them with grilled Hawaiian chicken for a cohesive island-inspired meal, or alongside grilled fish for a light yet satisfying pairing.
- Breakfast & Brunch: Don’t limit these to dinner! They are fantastic sliced and used for sweet breakfast sandwiches, or simply served warm with extra honey butter and jam.
Their adaptability means they truly enhance almost any meal, making them a consistently popular choice at any table.
Storing Your Homemade Hawaiian Rolls
To keep your freshly baked Hawaiian rolls at their peak softness and flavor, proper storage is essential. Once completely cooled, store the rolls in an airtight container, such as plastic wrap, a resealable plastic bag, or a bread bag, at room temperature. This will help maintain their moisture and prevent them from drying out. When stored correctly, these delightful rolls will remain fresh and delicious for 5-7 days.
Can You Freeze Baked Hawaiian Rolls?
Absolutely! Hawaiian rolls freeze beautifully, allowing you to enjoy them long after baking. To freeze baked rolls, ensure they are completely cooled. Place them in a single layer on a baking sheet and freeze for 1-2 hours until solid. This “flash freezing” prevents them from sticking together. Once frozen, transfer the rolls to a heavy-duty freezer bag or airtight container, removing as much air as possible to prevent freezer burn. They can be stored in the freezer for up to 1 month. When you’re ready to enjoy, simply thaw them at room temperature or gently reheat them in a low oven for a few minutes until warm and soft.
Can You Freeze Hawaiian Roll Dough?
Yes, freezing bread dough is an excellent way to prepare ahead and enjoy fresh rolls anytime. If you wish to freeze the dough before baking, it will keep for up to 6 months in the freezer. Here’s how:
- Shape and Flash Freeze: After the first rise, form the dough into individual balls as you would for baking. Place these dough balls on a baking sheet lined with parchment paper, ensuring they don’t touch. Stick the baking sheet into the freezer for a couple of hours, or until the dough balls are solid.
- Wrap for Storage: Once the dough balls are frozen solid, wrap each one tightly in plastic wrap. Then, place the wrapped dough balls into a large, heavy-duty freezer bag or an airtight freezer-safe container. This double layer of protection helps prevent freezer burn.
- Thawing and Baking: When you’re ready to bake, transfer the desired number of frozen dough balls to the refrigerator overnight to thaw slowly. The next morning, remove them from the fridge and place them on a greased baking sheet or in a baking dish. Allow them to come to room temperature and undergo their second rise in a warm, draft-free spot until doubled in size, as per the original recipe instructions. Proceed with brushing with honey butter and baking as written. This method gives you the convenience of freshly baked rolls without all the initial prep work on baking day.
Homemade Hawaiian rolls are truly in a league of their own, far surpassing their store-bought counterparts in flavor and tenderness. They make exceptional rolls for sliders, transforming simple sandwiches into something extraordinary. Our Cheeseburger sliders or French dip sliders are particularly fantastic when served on these sweet, fluffy buns. While store-bought options are convenient, these homemade rolls are absolutely divine if you’re aiming for a completely from-scratch experience that will impress everyone.
If you’re yearning for soft, fluffy homemade rolls that feel like warm, comforting pillows of carb-loving heaven, then these **Hawaiian rolls** deserve the top spot on your baking list. Their unique sweetness and unparalleled texture will quickly make them a cherished recipe in your culinary repertoire.
More Delicious Homemade Roll Recipes:
If you love the satisfaction of baking your own bread, explore these other fantastic roll recipes perfect for any occasion:
- Pumpkin Dinner Rolls
- One Hour Rolls
- Orange Rolls
- Cheesy Herb Rolls
- Hoagie Rolls
- Potato Rolls
- Sweet Potato Rolls
Homemade Hawaiian Rolls Recipe Card
Homemade Hawaiian Rolls
By Sweet Basil
Prep Time: 2 hours
Cook Time: 20 minutes
Total Time: 2 hours 20 minutes
Servings: 42 rolls
Ingredients
For the Rolls:
- 2 Cups Milk
- 1/4 Cup Unsalted Butter
- 1 Cup Water
- 1 Cup Pineapple Juice
- 1/4 Cup Sugar
- 1/2 Cup Honey
- 3 Tablespoons Instant Yeast
- 1/4 Cup Vegetable Oil
- 2 Tablespoons Fine Sea Salt
- 3/4 Cup Evaporated Milk
- 1 Large Egg, whisked
- 11-13 Cups All-Purpose Flour
For the Honey Butter Glaze:
- 4 Tablespoons Honey
- 1/2 Cup Butter
Instructions
- In a saucepan over medium heat, add the milk and cook until just starting to foam around the edges and is warmed. Do not boil.
- Gently place the butter, water, pineapple juice, sugar, and honey in the pan and stir until the butter has melted. Allow the mixture to cool to lukewarm.
- Sprinkle the yeast over the lukewarm mixture and stir to combine. Pour it all into a stand mixer bowl and allow to rest for 3-5 minutes or until foamy.
- Pour the vegetable oil, sea salt, evaporated milk, and whisked egg into the mixer and stir to combine.
- Add in 8 cups of flour. Using a dough hook attachment, mix the dough until it begins coming together.
- Carefully pour in additional flour, about a cup at a time, until the dough forms a ball around the hook and is soft and elastic.
- Remove the bowl from the mixer and cover with a cloth. Allow the dough to rise in a warm, draft-free place for 1 hour or until doubled in size.
- Heavily sprinkle flour on your work surface and turn the risen dough out.
- Flip the dough over so all sides have flour and it isn’t sticky.
- Shape the dough into uniform balls and place them onto a greased baking sheet or into a baking dish.
- Let the shaped rolls rise again until doubled in size. While they rise, prepare the honey butter glaze (see instructions below).
- Once risen, brush the tops of the rolls with the honey butter.
- Bake the rolls at 350°F (175°C) for 20-25 minutes, or until golden brown.
- Remove the rolls from the oven and gently rub honey butter all over the tops again for a final glaze.
- Store the baked rolls in plastic wrap or bread bags for up to 1 week, or freeze for up to 1 month.
Honey Butter Glaze Instructions:
- Combine honey and butter in a small saucepan over medium heat. Stir until melted together, then set aside.
- Apply the honey butter to the rolls after their second rising in the pan, and again immediately after baking.
Nutrition Information
Serving: 1g, Calories: 118kcal, Carbohydrates: 21g, Protein: 3g, Fat: 2g, Saturated Fat: 1g, Cholesterol: 6mg, Sodium: 447mg, Potassium: 55mg, Fiber: 1g, Sugar: 3g, Vitamin A: 31IU, Vitamin C: 1mg, Calcium: 27mg, Iron: 1mg
Nutrition information is automatically calculated, so should only be used as an approximation.
REMEMBER TO SUBSCRIBE TO our FREE Oh Sweet Basil NEWSLETTER AND RECEIVE EASY RECIPES DELIVERED INTO YOUR INBOX EVERY DAY!
When you try a recipe, please use the hashtag #ohsweetbasil on INSTAGRAM for a chance to be featured in our stories! FOLLOW OH, SWEET BASIL ON FACEBOOK | INSTAGRAM | PINTEREST | TWITTER FOR ALL OF OUR LATEST CONTENT, RECIPES AND STORIES.