
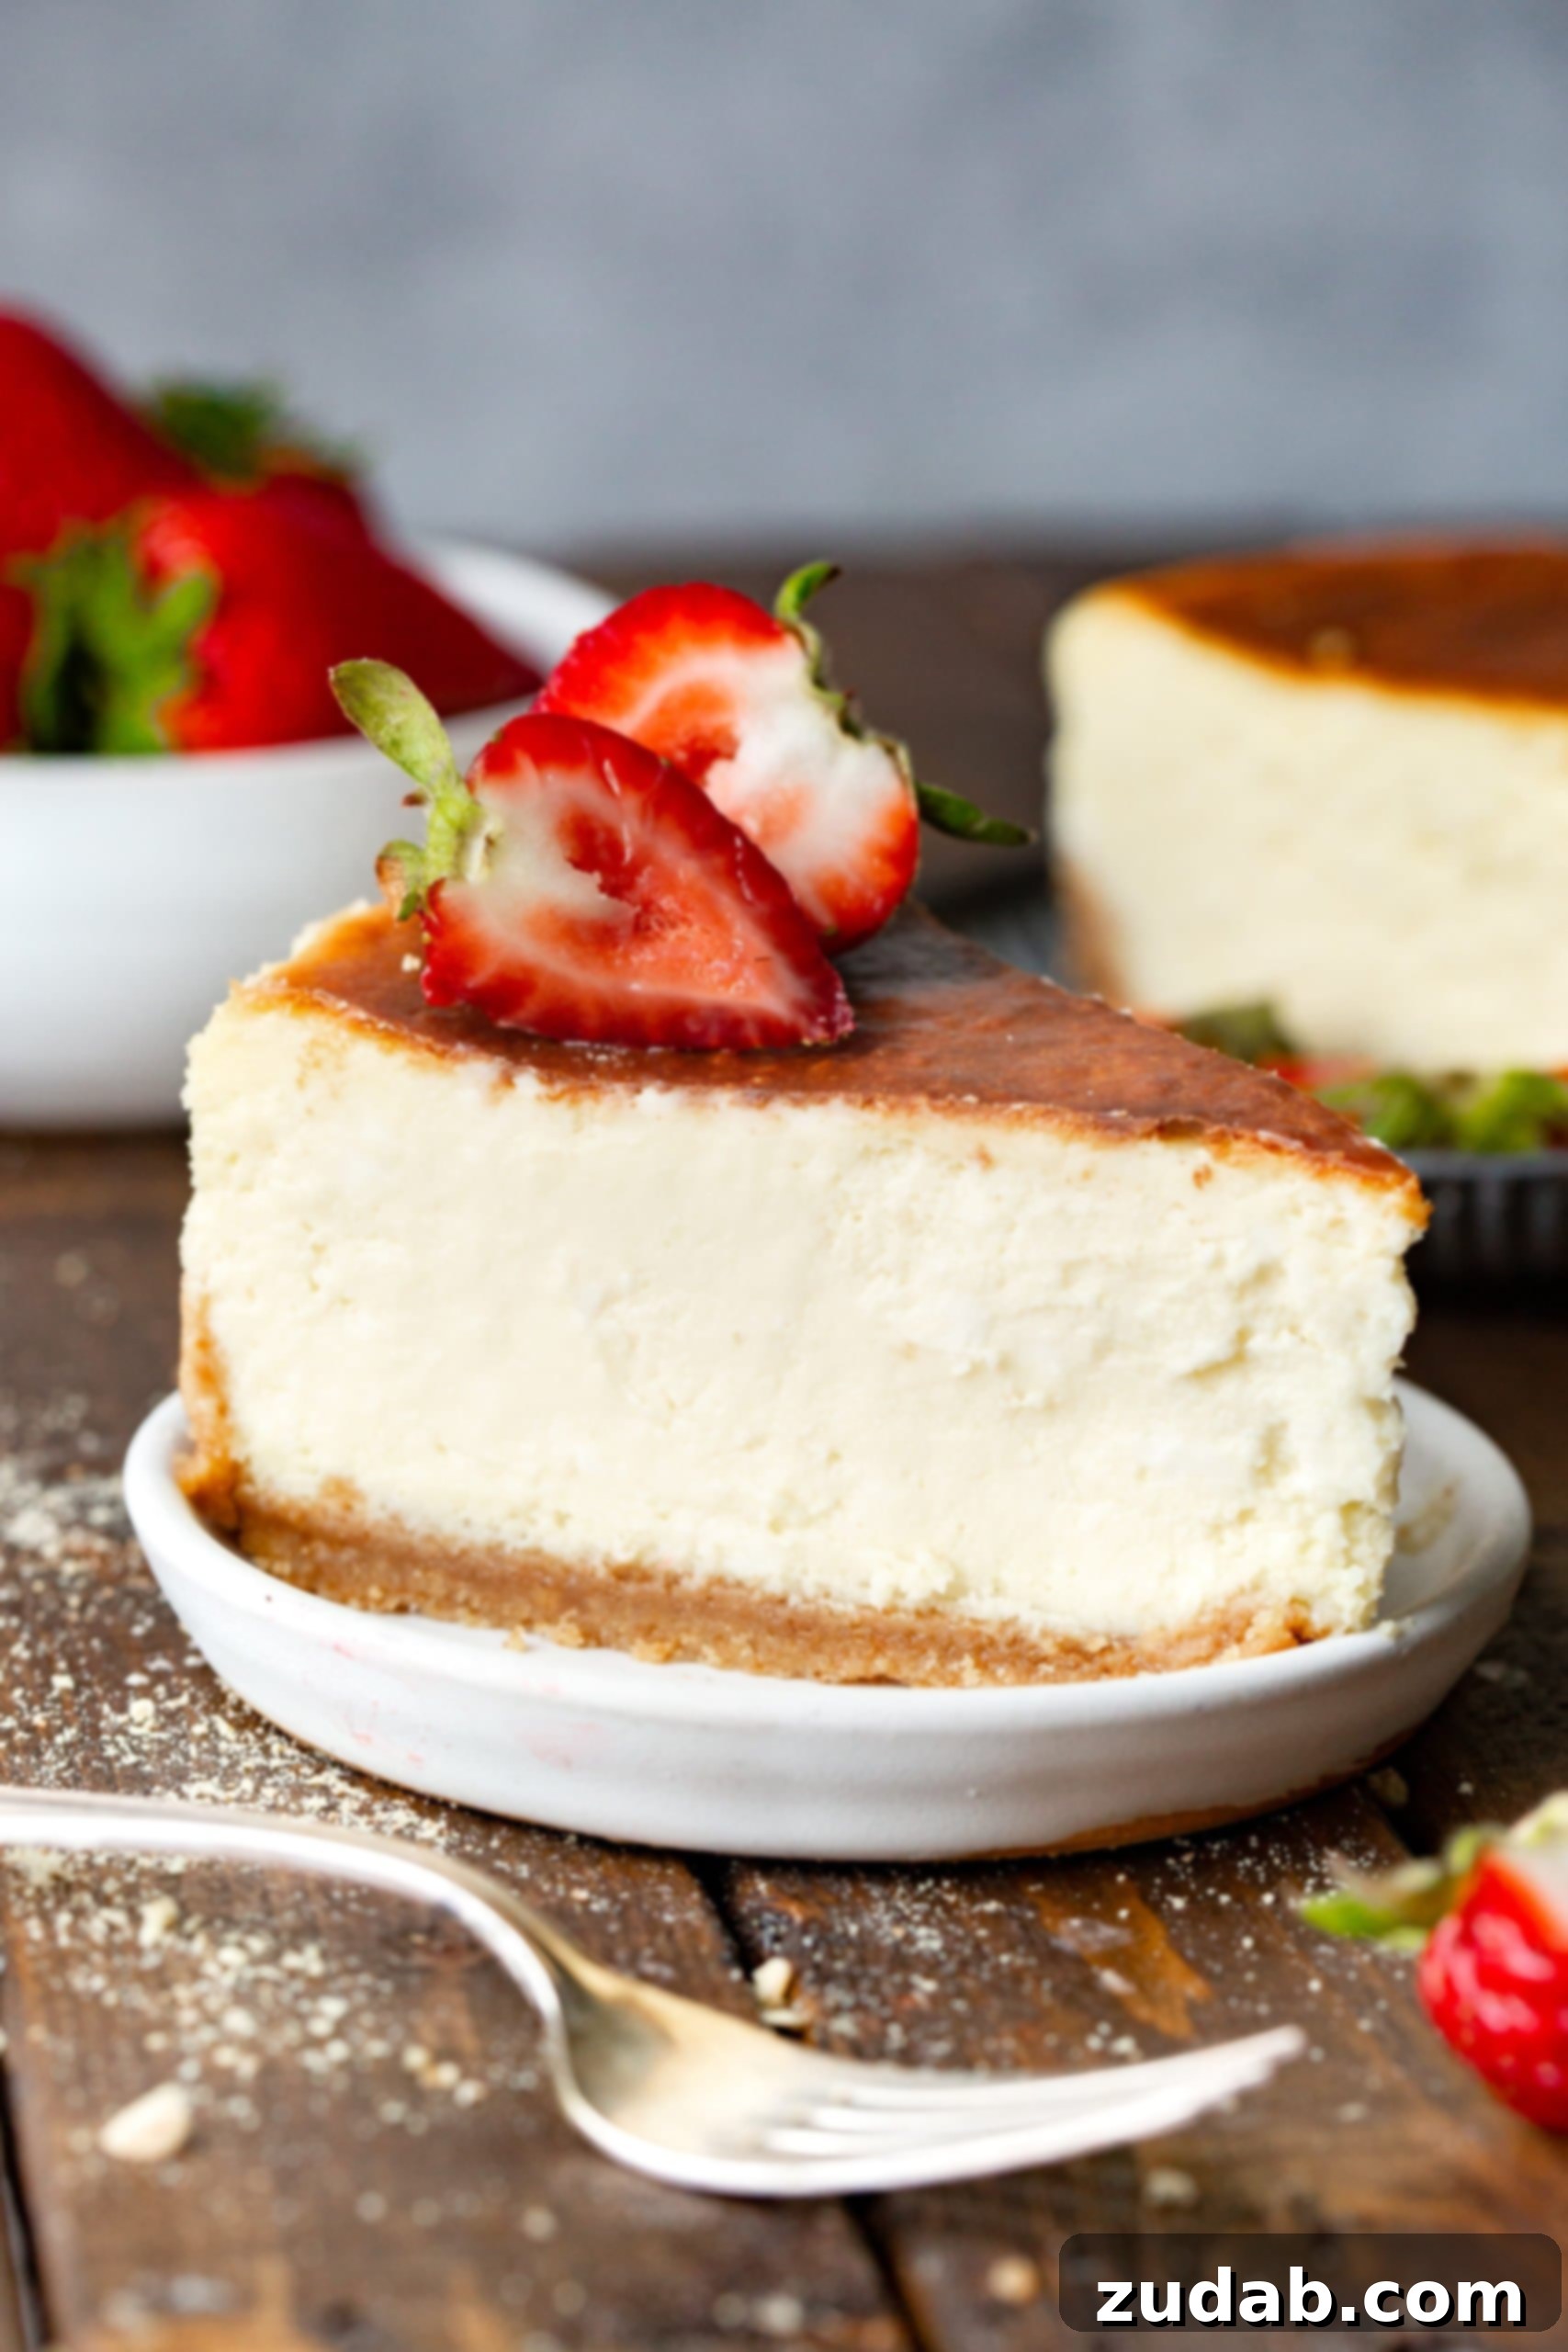
Welcome to the ultimate guide for creating the best cheesecake recipe you’ll ever taste. Forget everything you thought you knew about baking the perfect cheesecake; this recipe is designed to be rich, incredibly creamy, and entirely achievable for bakers of all skill levels. We’re here to demystify the process and share all the essential tips and tricks to ensure your homemade cheesecake turns out flawlessly every single time. Prepare to impress your family and friends with a dessert that’s not just delicious, but also perfectly smooth, crack-free, and utterly irresistible.
Essential Tip for a Crack-Free Cheesecake: The Water Bath Method
One of the most crucial secrets to an evenly baked, non-cracked, and perfectly smooth cheesecake lies in the water bath. This technique is a game-changer and, I swear, it’s the reason I haven’t had a cracked cheesecake in years. When you bake a cheesecake in a water bath, the moist, steamy environment in the oven helps the cake bake gently and evenly. This prevents the edges from cooking too quickly and creating a stark temperature difference with the center, which often leads to cracks. Additionally, it helps maintain a consistent internal temperature, promoting that signature creamy texture throughout.
To implement this, you’ll need to wrap your springform pan in several layers of heavy-duty aluminum foil. This creates a protective barrier, preventing any water from seeping into your delicious cheesecake. Think of it as a secret weapon, much like those fabric strips used around cake pans to ensure an even bake. Nonstick foil is particularly effective, offering an extra layer of protection and peace of mind.
The Irresistible Allure of a Classic Graham Cracker Crust
Growing up, I admit I had a complicated relationship with cheesecake. While the creamy, tangy filling wasn’t always my favorite, the graham cracker crust was an entirely different story. I’d often sneak into the kitchen, covertly picking off pieces of the crunchy, buttery crust from my mom’s cheesecakes when she wasn’t looking. It was an irresistible call that echoed through the house, pulling me to that sweet, crumbly base.
Looking back, I imagine that would totally annoy me if someone did that to my cheesecake today! My mom, being the saint she was, likely knew but chose to let us kids explore and grow without constant nitpicking. I’ve truly appreciated that lately, how she fostered an environment for us to mature rather than imposing overly high expectations on our developing minds.
While my taste buds have evolved to appreciate the entire cheesecake experience, a poorly made cheesecake can still easily be turned down. This recipe, however, is far from “poorly made.” This is the kind of cheesecake you’ll want to print, laminate, and keep permanently in your recipe arsenal. It’s truly a keeper, offering a harmonious balance of flavors and textures that will win over even the most discerning palates.
Unveiling the Secrets of Our Perfect Cheesecake
Let’s dive deeper into what makes this particular cheesecake stand out and why it will become your go-to recipe:
- Texture: Expect an extraordinary creamy, smooth, and rich consistency that extends uniformly from the edge to the very center. Each bite offers a velvety melt-in-your-mouth experience, perfectly complemented by that beloved crunchy graham cracker crust—still my favorite part! This luxurious texture is achieved through careful ingredient preparation and precise baking techniques.
- Flavor: The flavor profile is a sublime balance of tanginess and sweetness. It’s perfectly calibrated to be neither too tart nor overly sugary, allowing the rich cream cheese notes to shine. This versatile base welcomes a myriad of toppings, allowing you to customize it to your personal preferences. Whether you prefer classic fruit sauces or decadent chocolate, this cheesecake provides the ideal canvas.
- Difficulty: I’d rate this recipe as medium in difficulty. While it requires attention to detail and patience, it’s certainly not impossible. With our comprehensive, fail-proof tips, bakers of any experience level can confidently tackle this recipe and achieve spectacular results. The key is to follow each step diligently, especially the crucial resting and chilling phases.
- Time: Be prepared for some advance planning. The total time from start to finish will span over 12 hours. However, don’t let this deter you! The vast majority of this duration is dedicated to passive resting and chilling time, which is absolutely essential for the cheesecake to properly set, develop its full flavor, and achieve that impeccable, crack-free texture. Your patience will be richly rewarded.
Key Ingredients for Your Best Homemade Cheesecake
It’s truly remarkable how a dessert so delicious, decadent, and elegant can be created with just a handful of simple ingredients. The quality of these ingredients plays a significant role in the final outcome, so always opt for the best you can find. Here’s a breakdown of what you’ll need to create this show-stopping dessert:
For the Irresistible Crust:
- Graham Cracker Crust: This foundational layer adds a delightful crunch and a hint of spice that perfectly complements the creamy filling.
- Graham Crackers: I’m a loyal fan of Honey Maid for their consistent quality and classic flavor, but feel free to use your preferred brand. You can either grind whole crackers into fine crumbs using a blender or food processor, or save time by purchasing pre-crushed graham cracker crumbs.
- Granulated Sugar: A small amount of sugar is incorporated into the crust mixture to enhance its sweetness and help with browning during the initial bake.
- Melted Butter: Unsalted butter is crucial for binding the graham cracker crumbs and sugar together, forming a firm and flavorful crust that holds its shape beautifully.
For the Velvety Cheesecake Filling:
- Cream Cheese: The star of the show! Use full-fat, block-style cream cheese, softened to room temperature. This ensures a smooth, lump-free batter.
- Granulated Sugar: Provides the perfect level of sweetness, balancing the tanginess of the cream cheese.
- Salt: A pinch of salt enhances all the other flavors, bringing out the best in both sweet and tangy notes.
- Vanilla Extract: High-quality pure vanilla extract adds warmth and depth to the flavor profile.
- Lemon Extract (or fresh lemon zest/juice): A touch of lemon extract brightens the overall flavor, contributing to that signature tangy cheesecake taste.
- Large Eggs and Egg Yolks: Essential for structure and richness. Ensure they are at room temperature for optimal emulsification and a crack-free finish.
- Sour Cream: Adds an extra layer of creaminess and a subtle tang that enriches the cheesecake’s texture and flavor.
- Heavy Cream: Contributes to the ultra-rich, smooth, and luxurious consistency of the filling. (A note: some prefer to use more sour cream in place of heavy cream for a tangier, denser cheesecake.)
Mastering Cheesecake: Essential Tips for Baking Success
We’ve all experienced the heartbreak of a cracked cheesecake, or one that collapses into an unset mess. It’s a frustrating and disheartening outcome after investing time and effort. To help you avoid these common pitfalls and achieve cheesecake perfection, here are our top tips for success:
Invest in a Quality Springform Pan
A springform pan is an absolute non-negotiable for cheesecake baking. Attempting to use a regular cake pan will make slicing and serving an absolute beast of a task. Take my word for it: a good quality springform pan makes life infinitely easier when it comes to presenting your beautiful dessert. Its removable sides allow for effortless release, preserving the pristine edges of your cheesecake.
Bring Ingredients to Room Temperature
This tip is paramount for a smooth, lump-free cheesecake. Ensure your cream cheese, sour cream, and eggs are all at room temperature before you begin mixing. Here’s why:
- Cream Cheese: Softened cream cheese blends effortlessly, resulting in a perfectly smooth, creamy batter without any clumps. This is the foundation of a velvety cheesecake texture.
- Sour Cream: Room temperature sour cream incorporates seamlessly into the cream cheese and egg mixture, contributing to the overall smooth consistency.
- Eggs: Eggs at room temperature emulsify more easily with the fats in the cream cheese, distributing evenly throughout the batter. This even distribution is critical for the cheesecake’s structure and elasticity, which directly prevents cracking during baking and cooling. Cold eggs can seize the cream cheese, leading to lumps and overmixing, both of which are crack culprits.
- Mixing Eggs: When adding the eggs, incorporate them one at a time, beating just until each is fully combined before adding the next. This prevents overmixing and ensures a cohesive batter.
Resist the Urge to Open the Oven Door
Drastic and sudden changes in temperature are a primary cause of cheesecake cracks. Once your cheesecake is baking, avoid opening the oven door, especially during the crucial cooling period after the oven is turned off. The sudden rush of cool air can shock the delicate structure of the cheesecake, causing it to contract rapidly and crack.
Utilize a Water Bath for Optimal Baking
As mentioned, a water bath is your best friend for cheesecake success:
- A water bath introduces moisture into the oven, creating a steamy environment that helps the cheesecake bake slowly and evenly. This gentle baking prevents overbaking and ensures a silky-smooth texture.
- Wrapping your springform pan in several layers of heavy-duty foil is crucial. This step ensures that no water from the bath leaks into your cheesecake, protecting your crust and filling for a perfect bake.
Embrace the Importance of Rest and Chill Time
Patience is truly a virtue when it comes to cheesecake. The resting and chilling phases are just as vital as the baking itself:
- After baking for 1 hour, turn off the oven. Critically, leave the cheesecake inside the oven with the door closed for an additional 35 minutes. This slow, gradual cooling within a warm environment helps prevent cracks.
- Next, gently run a thin knife around the edge of the cheesecake (while still in the pan) to loosen it slightly from the sides. Then, return it to the oven with the door shut for another 2-4 hours. This extended resting period allows the cheesecake to continue setting and prevents sudden temperature changes.
- Finally, remove the cheesecake from the oven and carefully take it out of the water bath. Let it cool completely on a wire cooling rack at room temperature. Air circulation around the entire pan aids in even cooling.
- Once it has cooled completely, wrap the cheesecake tightly in plastic wrap and transfer it to the refrigerator. Chill for a minimum of 8 hours, or ideally overnight (10-12 hours). This prolonged chilling time is essential for the cheesecake to firm up, achieve its ultimate creamy texture, and allow the flavors to fully meld.
Elevate Your Cheesecake: Delicious Topping Ideas
Do you enjoy your cheesecake plain, savoring its pure, unadulterated flavor, or are you a fan of lavish toppings? I’m definitely in the latter camp; I believe a great topping can truly elevate the cheesecake experience. Here are some fantastic ideas to crown your homemade masterpiece:
- Raspberry sauce or homemade strawberry sauce for a classic fruit burst.
- Fresh berries: A colorful medley of strawberries, raspberries, blueberries, or blackberries adds freshness and a hint of tartness.
- Decadent chocolate sauce or rich ganache for chocolate lovers.
- Homemade whipped cream, lightly sweetened and perfectly airy.
- Rich salted caramel sauce for a delightful sweet and savory contrast.
- Bright and tangy lemon curd for a zesty twist.
- Toasted coconut flakes for a tropical crunch.
- Mini chocolate chips or elegant chocolate shavings.
- Warm apple pie filling or classic cherry pie filling for a comforting dessert.
- Crushed Oreos or other cookies for an extra layer of texture and flavor.
Achieving Perfection: Knowing When Your Cheesecake is Truly Done
Determining the doneness of a cheesecake can be tricky, but there’s a simple trick. When it comes to cheesecakes (and not my midsection… haha!), a slight jiggle in the very center is actually a good sign. The key is that the outer few inches of the cheesecake, near the edges of the pan, should appear set and firm. The middle, however, should still have a gentle, custard-like wobble, similar to very firm Jell-O. This ensures a creamy texture and prevents overbaking. The residual heat from the oven and the subsequent chilling process in the refrigerator will complete the setting of the center, transforming it into that perfectly smooth, rich consistency we all crave.
Cracked Cheesecake? Understanding and Preventing Common Baking Woes
After years of perfecting this recipe, I’ve identified a few primary culprits behind the dreaded cracked cheesecake. Understanding these factors is key to preventing them:
- Using Cold Ingredients: This is arguably the biggest offender. When I emphasize “room temperature,” I genuinely mean it! Cold cream cheese, eggs, or sour cream will lead to a lumpy batter that you’ll be tempted to overmix.
- Overmixing the Batter: Once the cream cheese is smooth, mix only until the ingredients are just combined and smooth. Excessive beating introduces too much air into the batter, which expands during baking and then collapses during cooling, causing cracks.
- Opening the Oven Door During Cooling: As discussed, sudden temperature changes are a cheesecake’s worst enemy. Resist the urge to peek during the crucial resting phase in the turned-off oven.
- Skipping the Water Bath: A water bath provides the essential moist, even heat necessary for a smooth, crack-free surface. Always use heavy-duty foil to protect your springform pan from water leakage.
- The Main Culprit: Over-Baking! An overbaked cheesecake will be dry, tough, and almost certainly cracked. Watch for the subtle jiggle in the center, as described above, to know when it’s done.
For even more in-depth solutions and troubleshooting, we have a dedicated post on how to avoid a cracked cheesecake that covers all the answers you need.
Storage and Preservation: Keeping Your Cheesecake Fresh
Proper storage is essential to maintain the freshness and quality of your cheesecake:
- Cheesecake should always be stored in the refrigerator.
- When properly covered (ideally with plastic wrap to prevent it from absorbing other fridge odors), it will keep beautifully for up to 5 days in the fridge.
Freezing Cheesecake: How to Store for Later Indulgence
Cheesecake freezes exceptionally well, making it a perfect make-ahead dessert or a treat to enjoy later. Here’s how to freeze it effectively:
- I prefer to cut the cheesecake into individual slices before freezing. This makes it easy to thaw and serve single portions whenever a craving strikes.
- Arrange the individual slices on a baking sheet lined with parchment paper and place them in the freezer for a couple of hours, or until solid.
- Once thoroughly frozen, wrap each slice tightly in plastic wrap, then place all the wrapped pieces into an airtight freezer-safe container or a heavy-duty ziploc bag. This double layer of protection helps prevent freezer burn.
- Cheesecake can be stored in the freezer for up to one month, retaining its delicious flavor and creamy texture.
- To enjoy, simply thaw individual slices in the refrigerator for a few hours before serving.
It’s time to conquer any fears or hesitation you might have about making cheesecake from scratch. With these detailed tips and our foolproof recipe, you are now equipped to create the best cheesecake recipe of all time. Get ready to bake a masterpiece that will be the highlight of any gathering!
Explore More Delicious Cheesecake Recipes:
- Lime Cheesecake with Triple Berry Sauce
- Lemon Curd Cheesecake Tart
- New York Cheesecake
- Mini Strawberry Cheesecakes
- No Bake Mini Cheesecakes with Raspberry Sauce
- Easy Baked Cheesecake with Fresh Cherry Sauce
- Mini Twix Caramel Cheesecakes
- Mini Dutch Apple Cheesecakes
- No Bake Caramel Cheesecake Bars
- Swirled Raspberry Lemon Cheesecake Bars
Best Cheesecake Recipe
By Sweet Basil
Cook Time: 1 hr 40 mins
Total Time: 12 hrs 25 mins
Ingredients
Crust
- 1 Graham Cracker Crust
Cheesecake Filling
- 5 Blocks Cream Cheese, softened, 40oz
- 1 1/2 Cups Sugar
- 1/8 teaspoon Salt
- 2 teaspoons Vanilla
- 1/2 teaspoons Lemon Extract
- 5 Large Eggs, plus 3 egg yolks, large, room temperature
- 2 Tablespoons Sour Cream
- 1/3 Cup Heavy Cream, *see note
Instructions
- Preheat the oven to 350 degrees F (175°C).
- Spray a 9-inch springform pan with nonstick spray all along the inside.
- Wrap foil around the outside of the pan, covering the bottom and extending up the sides, two to three times to protect it from the water bath.
- Set the prepared pan aside.
- In a large bowl, combine the crust ingredients and press firmly into the bottom of the springform pan. Bake for 8 minutes. Remove and cool while you prepare the filling.
For the Filling
- In a standing mixer fitted with a whisk attachment, or a large bowl with a hand mixer, beat the softened cream cheese until completely smooth, scraping down the sides of the bowl as needed.
- Add in the sugar, salt, vanilla, and lemon extract. Beat again until the mixture is smooth and well combined.
- Add the eggs and egg yolks one at a time, beating just until fully incorporated after each addition. Avoid overmixing.
- Switch to a spoon or rubber spatula and gently stir in the sour cream and heavy cream until just combined.
- Pour the cheesecake filling over the cooled crust and gently smooth out the top.
- Place the cheesecake in a large roasting pan or another larger cake pan. Fill the outer pan with approximately 2 inches of hot water to create a water bath.
- Carefully transfer the cheesecake in its water bath to the preheated oven and bake for 1 hour.
- After 1 hour, turn the oven off. Leave the cheesecake undisturbed in the oven with the door closed for another 35 minutes.
- After 35 minutes, gently run a thin knife around the edge of the cheesecake to loosen it from the pan. Close the oven door again and let it sit in the cooling oven for another 2-4 hours.
- Remove the cheesecake from the oven and carefully take it out of the water bath.
- Allow the cheesecake to cool completely on a wire cooling rack, which encourages air circulation around the cheesecake.
- Once completely cooled, cover the cheesecake tightly with plastic wrap and chill it in the refrigerator for at least 8-10 hours, or preferably overnight, before serving.
Recipe Notes
- You may use an additional 1/3 cup of sour cream instead of the heavy cream for the cheesecake filling if you prefer a slightly tangier and denser result.
- Cheesecake will keep fresh for up to 5 days when stored properly in the refrigerator.
Nutrition
Serving: 1 slice, Calories: 335kcal, Carbohydrates: 52g, Protein: 5g, Fat: 12g, Saturated Fat: 5g, Polyunsaturated Fat: 1g, Monounsaturated Fat: 6g, Trans Fat: 1g, Cholesterol: 116mg, Sodium: 182mg, Potassium: 78mg, Fiber: 1g, Sugar: 42g, Vitamin A: 322IU, Vitamin C: 1mg, Calcium: 32mg, Iron: 1mg
Nutrition information is automatically calculated and should only be used as an approximation.
REMEMBER TO SUBSCRIBE TO our FREE Oh Sweet Basil NEWSLETTER AND RECEIVE EASY RECIPES DELIVERED INTO YOUR INBOX EVERY DAY!
When you try a recipe, please use the hashtag #ohsweetbasil on INSTAGRAM for a chance to be featured in our stories! FOLLOW OH, SWEET BASIL ON FACEBOOK | INSTAGRAM | PINTEREST | TWITTER FOR ALL OF OUR LATEST CONTENT, RECIPES AND STORIES.